How to Knead Bread Dough Properly (With or Without a Stand Mixer)
The first time I kneaded bread dough, I treated it like I was trying to win a wrestling match. I pushed too hard, added too much flour, and ended up with a stiff, dense loaf that could've doubled as a doorstop.
Kneading bread dough is a skill - but it's a learnable one. And once you feel what properly developed dough is supposed to feel like, you'll never forget it.
This guide covers everything you need to know about kneading: why it matters, the correct technique by hand, how to use a stand mixer, and the telltale signs that your dough is ready.
Why Kneading Matters for Baking Bread
When flour and water combine, two proteins - glutenin and gliadin - bond together to form gluten. Kneading aligns and strengthens these gluten strands, creating a stretchy, elastic network throughout the dough.
This network does two critical things:
- Traps the carbon dioxide released by yeast, allowing the dough to rise
- Provides structure so the loaf holds its shape during baking
Under-kneaded dough has weak gluten - it can't trap gas efficiently, so the loaf comes out dense, crumbly, and flat. Properly kneaded dough feels alive: smooth, springy, and elastic.
This is one of the core steps covered in our Complete Beginner's Guide to Baking Bread - worth reading if you haven't started there.
Before You Start: Set Up Your Surface
Work on a clean, lightly floured surface - a large wooden board, clean countertop, or silicone mat all work well. The key word is lightly. The number one beginner mistake is adding too much flour during kneading.
Sticky dough is normal. Resist the urge to keep dusting. Too much extra flour results in a stiff dough and a dense loaf. If dough is sticking to your hands, wet them slightly rather than reaching for more flour.
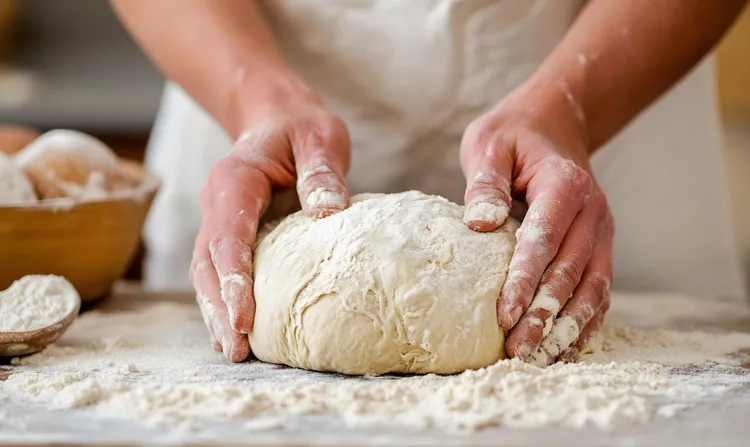
How to Knead Bread Dough by Hand: The Classic Technique
This is the traditional method and, once mastered, becomes almost meditative.
Step 1: Push Using the heel of your dominant hand, push the dough firmly away from you. Apply your body weight, not just arm strength - stand with your feet shoulder-width apart and lean into it.
Step 2: Fold Fold the far edge of the dough back toward you, roughly in half.
Step 3: Rotate Rotate the dough 90 degrees.
Step 4: Repeat Push, fold, rotate. Find a rhythm. For most beginner bread recipes, you're looking at 8-10 minutes of this motion.
Tip: Listen to your dough. After 4-5 minutes it will start to feel noticeably smoother. By 8-10 minutes it should feel silky, elastic, and barely tacky. That transformation is real and satisfying every single time.
What Properly Kneaded Dough Looks and Feels Like
- Smooth surface - the roughness and shaggy texture from mixing has disappeared
- Springy - when you poke it, the dough slowly springs back
- Slightly tacky, not sticky - it peels cleanly off the surface without leaving chunks
- Elastic - it stretches without immediately tearing
The Windowpane Test
This is the definitive test for gluten development:
- Pinch off a golf-ball-sized piece of dough
- Gently stretch it between your fingers into a thin sheet
- Hold it up to light
Pass: The dough stretches translucent thin - almost like a window - without tearing. Your gluten is fully developed.
Fail: It tears before getting thin. Keep kneading for 2-3 more minutes and test again.
How to Knead Bread Dough With a Stand Mixer
A stand mixer with a dough hook does the heavy lifting for you. Here's how to use it properly:
- Add your ingredients to the bowl (flour, water, yeast, salt)
- Mix on low speed (1-2) for 2 minutes to bring the dough together
- Increase to medium-low speed (3-4) and knead for 4-6 minutes
- The dough should pull away from the sides of the bowl and gather around the hook
Watch the dough, not the clock. When it's smooth, elastic, and clears the bowl sides, it's ready. Perform the windowpane test to confirm.
Common Mistake: Over-kneading in a stand mixer. Because it's effortless, it's easy to walk away and let it run too long. Over-kneaded dough can become tough and overly elastic. Check it every 2 minutes after the 4-minute mark.
Alternative Kneading Methods
Stretch and Fold (No-Knead Style)
Used in high-hydration and no-knead recipes, this technique replaces traditional kneading with a series of stretch-and-fold sets during the bulk fermentation:
- Wet your hand, grab one side of the dough in the bowl
- Stretch it up and fold it over the center
- Rotate the bowl 90° and repeat - all four sides = one set
- Perform 4-6 sets, 30 minutes apart, during the first 2 hours of bulk fermentation
This technique builds gluten gently over time rather than all at once. See it in action in our No-Knead Overnight Bread recipe.
Slap and Fold (Bertinet Method)
For wetter doughs, this French technique works well:
- Pick up the dough and slap it against the counter
- Quickly fold the top of the dough over itself
- Rotate and repeat
It's messy but incredibly effective for high-hydration doughs that would stick badly with traditional kneading.
Common Kneading Mistakes to Avoid
Mistake 1: Adding too much flour. Sticky dough is not bad dough - it's normal dough. Every tablespoon of extra flour you add during kneading makes the final loaf denser. Tolerate the stickiness.
Mistake 2: Kneading for too long by hand. It's very hard to over-knead by hand (it takes extreme effort), but under-kneading is common. When in doubt, do the windowpane test rather than guessing by time.
Mistake 3: Kneading too aggressively. You don't need brute force - you need consistent, rhythmic motion. Think of it as a firm massage, not a battle. Aggressive tearing can actually damage gluten structure.
Frequently Asked Questions
Q: What if I can't knead for 10 minutes straight? Rest the dough for 5 minutes. Gluten continues to develop during rest (autolyse), and you'll find it much easier to knead afterward. Many bakers do 5 minutes, rest, 5 minutes.
Q: Can I knead in the bowl instead of on a surface? For very sticky, high-hydration doughs, yes - bowl kneading works. For standard doughs, a work surface gives you better leverage and control.
Q: How do I know if I've under-kneaded? Your dough will feel rough or shaggy, and the windowpane test will fail (dough tears quickly). After baking, under-kneaded bread often has a coarse, uneven crumb and may not rise well.
Q: Is hand kneading better than a stand mixer? Neither is objectively better - both produce excellent bread. Hand kneading gives you more tactile feedback, which is genuinely valuable when you're learning. A stand mixer is faster and consistent.
Practice Makes Perfect
The best way to learn how to knead bread dough is simply to do it - imperfect loaves included. After your first two or three bakes, the feel of properly developed dough will become intuitive.
Head to our Complete Beginner's Guide to Baking Bread and try the simple white sandwich loaf recipe. It's specifically designed to give beginners a clear, hands-on feel for proper dough development.
Tried hand-kneading and want to skip it entirely? Our No-Knead Overnight Bread uses time instead of effort to develop gluten - and the result is extraordinary.
More from the Beginner's Bread Series:
Latest