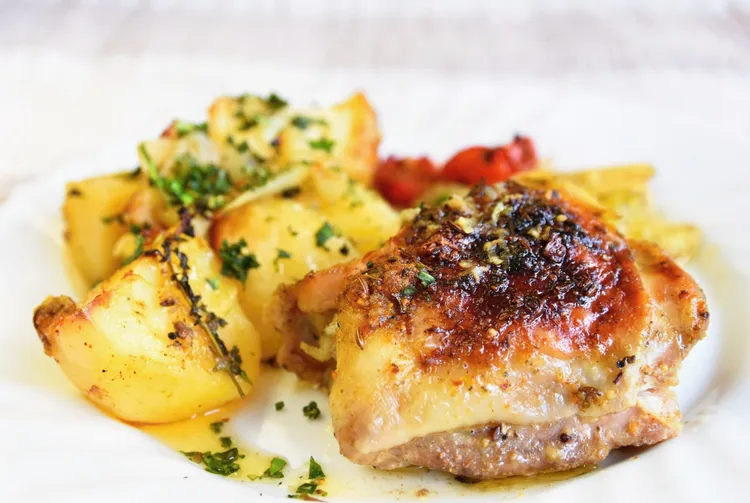
One-Pan Lemon Garlic Chicken Thighs with Roasted Vegetables
Crispy skin. Juicy meat. A proper pan sauce. Everything in one cast iron skillet.
If there is one recipe that defines one-pan cooking - that demonstrates, in a single dish, everything the format is capable of - this is it.
Bone-in, skin-on chicken thighs, seared until the skin is deeply golden and crackling, finished in a hot oven over seasonal vegetables that soften and caramelise in the chicken's rendered fat, and finished with a lemon-garlic pan sauce built from the cooking juices in four minutes flat. Everything on one plate. One pan to wash. On the table in 45 minutes.
This is the recipe most one-pan cooks make first. It is also the recipe they return to most often - because the formula is reliable, the results are consistently excellent, and the variations are almost unlimited. Master this once and you have a template that carries you through a year of weeknight cooking with nothing but the vegetables changing season to season.
📖 The technique behind this recipe: Before you make it, read the One-Pan Dinner Formula (the timing system for proteins and vegetables) and the Sheet Pan and Skillet Masterclass (how heat, space, and fat produce the results you want). Ten minutes of reading produces significantly better results.
Why Chicken Thighs, Not Breasts
This is a question worth answering directly, because chicken breast is what most people default to.
Chicken thighs are more forgiving. The dark meat of the thigh contains more fat and more connective tissue than breast meat. This means they remain juicy and flavorful across a wider range of internal temperatures - breast meat becomes dry at 76°C; thigh meat is excellent from 74°C all the way to 82°C. For a home cook, this 8°C window of forgiveness is enormously valuable.
Chicken thighs produce better crackling. The skin-to-meat ratio of a bone-in thigh is ideal for producing deeply crispy, golden skin without the meat underneath drying out. Breast skin produces good crackling too, but the lean breast meat underneath dries before the skin achieves the depth of colour that makes the dish visually and texturally excellent.
Chicken thighs make a better pan sauce. The fat rendered from thigh skin, combined with the bone's collagen, produces a pan sauce with a richness and body that breast meat simply cannot match. The pan juices from bone-in thighs are the foundation of a sauce that tastes like it took considerably more effort than it did.
Ingredients
Serves 4 | Active time: 15 minutes | Total time: 45 minutes
The Chicken
- 4 bone-in, skin-on chicken thighs (approximately 200-220g each)
- Fine sea salt - ½ tsp per thigh, applied 20 minutes before cooking if time allows
- Black pepper, freshly ground
- 1 tbsp olive oil
The Vegetables (Choose Your Season - see variations below)
Standard version:
- 400g baby potatoes (or small waxy potatoes, halved), parboiled for 8 minutes and drained
- 200g cherry tomatoes, whole
- 1 whole head of garlic, broken into unpeeled cloves
- 1 lemon, half sliced into rounds, half reserved for the sauce
- 4 sprigs fresh thyme (or 1 tsp dried)
- 2 tbsp olive oil for the vegetables
- Salt and pepper
The Pan Sauce
- 100ml dry white wine (or chicken stock)
- Juice of the remaining ½ lemon
- 1 tbsp cold unsalted butter
- 1 tbsp fresh parsley, finely chopped
Equipment
A 28-30cm cast iron skillet or heavy oven-safe frying pan. The cast iron is ideal - it retains heat through the searing stage and transfers directly to the oven without any thermal shock. An oven-safe stainless steel pan works. A non-stick pan with a plastic handle cannot go in the oven - do not use it for this recipe.
Method
Step 1: Prepare the chicken (5 minutes, up to 30 minutes before cooking)
Pat the chicken thighs completely dry with paper towels. This is the most important step for crispy skin - surface moisture is the enemy of browning. Every paper towel that comes away wet is moisture that would have produced steaming rather than searing.
Season the skin side generously with salt and pepper. Turn and season the flesh side. If time allows, leave uncovered at room temperature for 20-30 minutes - the surface dries further, producing even better browning.
Step 2: Preheat the oven and prepare the vegetables
Preheat the oven to 200°C (fan). While the oven heats, parboil the potatoes in salted water for 8 minutes until just barely cooked through. Drain, return to the pan, and shake over the heat for 30 seconds to steam-dry. Rough up the surfaces slightly - these rough edges brown and crisp better than smooth ones.
In a bowl, toss the par-boiled potatoes, cherry tomatoes, garlic cloves, and lemon slices with 2 tbsp of olive oil, salt, pepper, and thyme.
Step 3: Sear the chicken (8 minutes)
Heat 1 tbsp of olive oil in the cast iron skillet over medium-high heat until shimmering - not smoking, but clearly hot. Place the chicken thighs skin-side down. Do not move them. The sound should be an immediate, vigorous sizzle. If it is quiet, the pan is not hot enough - increase the heat and give it another minute.
Cook undisturbed for 6-8 minutes. The skin should release from the pan on its own when properly browned - if it is sticking, it is not ready to turn. When the skin is deeply golden and releases cleanly, the fat has fully rendered and the Maillard reaction has done its work.
Do not flip the chicken. Leave skin-side down throughout the searing stage.
Step 4: Add vegetables and transfer to the oven
Add the prepared vegetables to the skillet around and between the chicken pieces. They will sizzle in the chicken's rendered fat - this is correct and good.
Transfer the skillet to the preheated oven, still skin-side down. Roast for 25-30 minutes until:
- The chicken skin is deeply golden and crispy
- The internal temperature of the thickest part (at the bone) reaches 74°C
- The potatoes are golden at the edges
- The garlic cloves are soft and slightly caramelised
- The cherry tomatoes have burst and collapsed
Step 5: Rest and make the pan sauce (5 minutes)
Remove the skillet from the oven. Transfer the chicken to a plate and tent loosely with foil to rest for 5 minutes.
The pan sauce: The skillet will have approximately 2-3 tbsp of rendered fat and dark, caramelised cooking juices. Tip off excess fat, leaving approximately 1 tbsp in the pan. Return the skillet to medium heat on the hob.
Pour in the white wine. It will sizzle immediately. Scrape the bottom of the pan with a wooden spoon, releasing the fond (the browned bits) into the sauce. These concentrated flavour compounds are the foundation of the pan sauce. Add the lemon juice. Simmer for 2-3 minutes until reduced by half.
Remove from heat. Add the cold butter and swirl the pan until it melts into the sauce - this emulsifies the butter and gives the sauce a glossy, slightly thick consistency. Add the parsley. Taste and adjust seasoning.
Step 6: Serve
Return the rested chicken to the pan or serve on warm plates with the vegetables, squeezing the soft roasted garlic cloves from their skins. Spoon the pan sauce over everything. Serve immediately.
Seasonal Variations
The formula stays exactly the same across all four seasons. Only the vegetables change.
Spring
Swap the potatoes, tomatoes, and garlic for:
- 400g new potatoes, halved and parboiled
- 200g asparagus spears, added in the last 12 minutes
- 100g frozen peas, stirred into the pan with 5 minutes remaining
Finish with fresh mint and a squeeze of lemon. The lightest, most spring-like version.
Summer
Swap for:
- 2 courgettes, sliced into thick rounds
- 2 red peppers, cut into chunks
- 200g cherry tomatoes
Finish with fresh basil and a drizzle of good olive oil. Serve with crusty bread to mop up the juices.
Autumn
Swap for:
- 400g butternut squash, cubed (add first - needs 10 minutes head start)
- 200g chanterelle or chestnut mushrooms
- 1 red onion, cut into wedges
Add a splash of cider to the pan sauce instead of white wine. Finish with fresh sage.
Winter
Swap for:
- 400g parsnips and carrots, cut into batons (add 10 minutes before the chicken)
- 200g cavolo nero, stems removed and leaves roughly torn, added in the last 8 minutes
- 1 head of garlic, whole cloves
Add a tablespoon of wholegrain mustard to the pan sauce. Finish with fresh thyme.
Make-Ahead Notes
The chicken: Season and dry-brine (salt uncovered in the fridge) for up to 24 hours ahead. The extended dry-brine produces noticeably crispier skin and more seasoned meat.
The vegetables: Parboil the potatoes and prep all vegetables up to 4 hours ahead. Keep covered in the fridge; bring to room temperature before the dish goes in the oven.
The pan sauce: Cannot be made ahead - it is built from the fresh pan juices immediately after cooking. The 4-minute sauce is the only element that must be done in the moment.
Pro Tips
- The parboil makes a critical difference. Raw potatoes added to the pan with the chicken will not finish cooking in the same time as the chicken. Parboiled potatoes that are already cooked through will brown and crisp beautifully in the chicken fat during the oven stage.
- Squeeze the garlic. The whole, unpeeled garlic cloves roast into something sweet and spreadable - squeeze them directly from the skin onto the chicken or bread. This is one of the small pleasures of this dish.
- Use the rendered fat. The chicken renders significant amounts of flavoured fat during cooking. This fat, in which the potatoes and vegetables cook, is what makes them taste exceptional. It is not waste - it is the flavouring medium.
- Don't rush the sear. Six to eight minutes skin-side down feels too long. It is not. The skin needs that time to render its fat completely and achieve the colour that produces crispy, flavourful results. Patience in this step produces the best-looking, best-tasting result.
Common Mistake: Moving the Chicken During Searing The instinct is to move the chicken around the pan to check it, prevent sticking, or ensure even cooking. This instinct is wrong. The chicken will stick initially as it sears - this is the Maillard reaction working. As the skin crisps and the fat renders, the chicken will release from the pan on its own. Moving it before it releases tears the skin and prevents the browning from completing. Put it in, leave it for 6-8 minutes, and trust the process.
FAQ
Q: Can I use boneless, skinless chicken thighs?
Yes, with adjustments. Boneless, skinless thighs cook faster (20-22 minutes total in the oven, no searing needed) and don't produce the same amount of rendered fat for the pan sauce or vegetable cooking. Add 1 extra tbsp of olive oil to compensate. The result is still excellent but less rich than the bone-in version.
Q: What if I don't have a cast iron skillet?
Any heavy, oven-safe frying pan works - stainless steel is the best alternative. A regular frying pan with an oven-safe handle (check the manufacturer's temperature rating - most are rated to 200°C) is acceptable. If your pan cannot go in the oven, sear the chicken in the pan then transfer everything to a preheated sheet pan or roasting tin for the oven stage.
Q: My skin isn't getting crispy. What's wrong?
Three likely causes: (1) the chicken wasn't patted completely dry, (2) the pan wasn't hot enough before the chicken went in, or (3) the oven temperature is too low. All three are addressable. For the crispiest possible skin: dry-brine overnight, pat dry again immediately before cooking, sear in a properly preheated pan, and roast at 200°C fan (not conventional).
Q: Can I add more vegetables than this recipe calls for?
Yes, but use a sheet pan alongside the skillet rather than crowding everything into the skillet. The skillet handles the chicken perfectly; a separate sheet pan with additional vegetables ensures nothing is overcrowded. Combining everything in one undersized pan produces steamed rather than roasted vegetables.
🔗 Continue Cooking
Latest