Sheet Pan Chicken Fajitas: Better Than Any Takeaway
One tray, 30 minutes, properly charred - the fajita method that fixes every problem with the restaurant version
Fajitas have a problem in most home kitchens: they require three pans, constant attention, and the kind of high-heat stir-frying that a domestic hob does adequately but never brilliantly. The chicken goes in one pan, the peppers go in another, the tortillas warm in a third, and by the time everything is ready you have four items to wash and a kitchen full of smoke.
The sheet pan version solves all of this. Everything - chicken, peppers, onions - goes on one tray in a very hot oven, where the dry heat produces the char on the edges of the peppers and the caramelisation on the chicken that the restaurant version achieves over its commercial grill. Thirty minutes from start to plate. One tray to wash. And because the oven's dry heat is more intense and more even than a home hob at full blast, the results are often better than the pan version.
The secret is in three details: the marinade (which does the flavouring work so the oven only needs to produce the char), the temperature (220°C minimum - no lower), and the spacing (everything in a single layer with room to breathe, never piled up).
The Marinade: Where All the Flavour Comes From
The marinade is not a quick toss of spices over chicken. It is the entire flavour foundation of the dish, and it needs at least 30 minutes to begin its work - overnight is significantly better.
Why marinating matters here more than in most dishes: Sheet pan cooking is fast and dry. There is no sauce, no braising liquid, no reduction to build flavour during cooking. The flavour in the finished fajita comes from three sources: the marinade applied before cooking, the char produced by high heat during cooking, and the condiments applied after. The marinade is the largest of the three contributors.
A properly marinated chicken fajita filling has seasoning that runs through the meat, not just on the surface. The citrus acid in the marinade begins to denature the surface proteins, opening the texture slightly so the spices can penetrate. The oil carries the fat-soluble flavour compounds from the spices into and onto the meat. Twenty minutes of marinating produces a surface-level result; overnight produces a completely seasoned piece of chicken that tastes of the marinade at every depth.
Ingredients
Serves 4 | Active time: 15 minutes | Marinade: 30 minutes - overnight | Cook time: 20-25 minutes
The Marinade (Make Your Own Fajita Seasoning)
- 3 tbsp olive oil
- Juice of 2 limes (approximately 60ml) - fresh only
- 3 cloves garlic, minced
- 2 tsp ground cumin
- 1.5 tsp smoked paprika
- 1 tsp chipotle powder (or ½ tsp cayenne for more straightforward heat)
- 1 tsp dried oregano
- ½ tsp garlic powder
- ½ tsp onion powder
- 1 tsp fine sea salt
- ½ tsp black pepper
The Filling
- 600g chicken breast or boneless thighs - breast for leaner, thighs for juicier and more forgiving. Cut into strips approximately 1.5cm wide.
- 3 mixed peppers (red, yellow, orange - not green, which is bitter and turns unpleasantly soft), deseeded and sliced into 1cm strips
- 2 medium red onions, halved and sliced into 1cm wedges - keep the wedges intact for better char
To Serve
- 8-10 small flour tortillas or corn tortillas
- Soured cream - or Greek yogurt for a lighter version
- Guacamole or sliced avocado
- Cheddar cheese, grated
- Fresh coriander
- Lime wedges
- Pickled jalapeños
- Salsa verde (see The Street Food Sauce Bible)
Method
Step 1: Marinate the chicken (15 minutes + 30 min - overnight)
Combine all marinade ingredients in a bowl and whisk to combine. Add the chicken strips and toss thoroughly to coat every piece completely. Cover and refrigerate.
Minimum: 30 minutes at room temperature. Standard: 2-4 hours in the refrigerator. Best: Overnight in the refrigerator. The flavour difference between 30 minutes and overnight is significant - the spices penetrate the meat and the lime acid tenderises the exterior slightly.
Step 2: Prepare the vegetables
While the chicken marinates, slice the peppers and onions. Keep them in separate bowls if you want to add them to the pan at different times (onions benefit from a 5-minute head start - they take slightly longer to caramelise), or combine them for simplicity.
Toss both with 1 tbsp olive oil, a pinch of salt, and a pinch of the same fajita seasoning you used for the chicken (if any remains).
Step 3: Preheat the oven and pan
Preheat the oven to 220°C (fan) - this is not the moment for a moderate oven. The char that makes fajitas taste like fajitas requires high heat. At 180°C, everything steams; at 220°C, the edges caramelise and the colour develops correctly.
Place a large sheet pan (or two smaller ones - see spacing note below) in the oven while it preheats. A preheated pan produces immediate sizzle and char when the food hits it.
Step 4: Arrange and roast
The spacing rule is critical here: Fajita filling contains more moisture than most sheet pan ingredients - the peppers especially release significant liquid during cooking. If crowded, the moisture pools and the filling steams into a soft, pale, textureless result. Give everything space.
Arrange the peppers and onions on the hot pan in a single layer with clear space between the pieces. Do not mix the chicken in yet - add the chicken strips on top of or around the vegetables, distributed evenly, not piled.
If the pan is full: Use two pans. A crowded fajita pan is the most common failure mode of the sheet pan method.
Roast for 20-25 minutes, rotating the pan once at 12 minutes. The filling is ready when:
- The pepper edges are darkened and slightly charred
- The onion wedges are caramelised at the edges and slightly softened
- The chicken is cooked through (internal temperature 74°C) with visible colour on the surface
- The overall mix smells deeply spiced and slightly smoky
Step 5: Warm the tortillas and serve
In the last 5 minutes of cooking, wrap the tortillas in foil and place in the oven alongside the fajita filling. They warm through in 4-5 minutes.
Alternatively: warm tortillas directly over a gas flame for 20-30 seconds per side (produces a slight char that is excellent), in a dry pan over medium heat (45 seconds per side), or wrapped in a damp paper towel in the microwave for 30 seconds.
Step 6: Build and eat
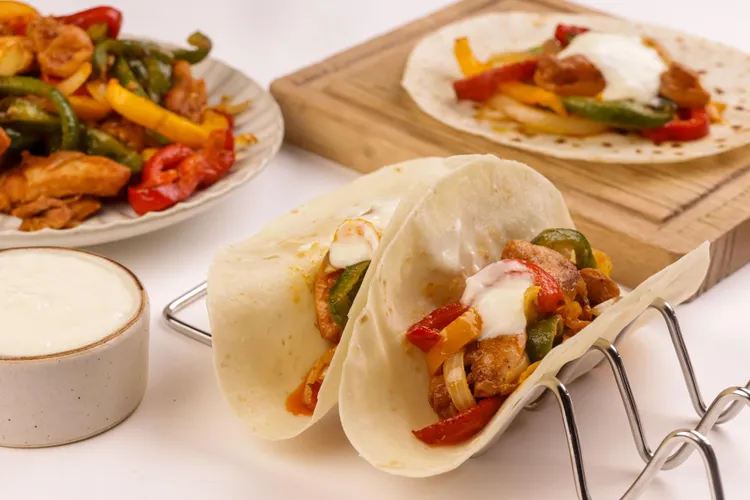
Serve everything to the table at once - the fajita filling on the pan or transferred to a warm serving dish, the tortillas in a cloth-lined basket, and all the condiments in small bowls. Everyone builds their own. This is the correct format.
The build order: Tortilla → soured cream or guacamole (acts as a moisture barrier that prevents the tortilla going soggy) → filling → cheese → salsa → coriander → squeeze of lime.
The Vegan Version: Mushroom and Pepper Fajitas
The mushroom version is not the vegan version as an afterthought. It is an excellent dish in its own right - the combination of large portobello or king oyster mushrooms with peppers produces a filling that has the meaty satisfaction of the chicken version with a completely different flavour profile.
Adjustments
- Replace chicken with 500g mixed mushrooms - portobello (cut into thick strips), king oyster mushrooms (torn into large pieces), and shiitake (halved). The variety produces a more interesting texture than any single type.
- Use the same marinade (it is naturally vegan) but reduce the lime juice to 1 lime - mushrooms are more delicate than chicken and over-acidifying dulls their flavour.
- Marinate for 15 minutes only - mushrooms absorb flavour very quickly and become waterlogged if marinated too long.
- Roast at 220°C for 18-20 minutes - mushrooms cook faster than chicken and release significant liquid. Watch carefully; they go from perfectly charred to overcooked faster than chicken.
Make Your Own Fajita Seasoning: The Storecupboard Blend
The spice quantities in the marinade above make enough for one batch. Scale up ×4 and store in a sealed jar - this amount makes four batches and keeps for 3 months in a cool, dark cupboard.
The 4-batch blend:
- 8 tsp ground cumin
- 6 tsp smoked paprika
- 4 tsp chipotle powder
- 4 tsp dried oregano
- 4 tsp garlic powder
- 4 tsp onion powder
- 4 tsp fine sea salt
- 2 tsp black pepper
To use: 3 tbsp of this blend + 3 tbsp olive oil + 60ml lime juice = one complete fajita marinade.
Having this blend in the cupboard reduces the marinade step from 10 minutes to 2 minutes. It also works on: jacket potato toppings, roasted chickpeas, grilled corn, sweet potato wedges, and as a dry rub for any grilled protein.
Variations
Prawn Fajitas
Replace chicken with 500g large raw prawns, peeled and deveined. Marinate for 10 minutes only (the lime acid cooks the surface of prawns rapidly - longer marination produces a texture change). Roast at 220°C for 8-10 minutes only - prawns cook very fast. Add to the pan 10-12 minutes after the peppers and onions have started roasting.
Steak Fajitas (Carne Asada)
Replace chicken with 500g skirt or flank steak, cut against the grain into strips. Use the same marinade. For the best result: marinate overnight, then sear in a very hot cast iron pan rather than roasting - the high direct heat of the hob produces better caramelisation on thin steak strips than the oven. See the Carne Asada technique in the Mexican Street Tacos post.
Breakfast Fajitas
Roast the peppers and onions as above (no chicken). Remove from the oven. Make a small well in the vegetable mix in a cast iron skillet. Crack 4 eggs into the wells. Return to a 180°C oven for 8-10 minutes until the whites are set. The pepper-onion-egg combination with tortillas and hot sauce is one of the best breakfasts in this collection.
Pro Tips
- Slice the chicken against the grain. Cutting perpendicular to the muscle fibres produces more tender strips. Cutting with the grain produces stringy, tough pieces. Identify the direction of the fibres in the breast or thigh and cut across them.
- Don't skip the overnight marinade. The difference between 30-minute and overnight marinating is the difference between flavoured chicken and seasoned chicken. Plan ahead by 12 hours and the result is significantly better.
- The peppers go in first if you want proper char. If maximum caramelisation on the peppers is the priority, give them a 5-minute head start before adding the chicken. Combined entry produces good results; staggered entry produces great results.
- Serve everything at once. Assembled fajitas go soggy within 2 minutes. Serving the components separately and letting everyone build their own produces a better experience - and means the last person to fill their tortilla has the same quality as the first.
Common Mistake: Using Green Peppers Green peppers are unripe red, yellow, or orange peppers. They have a sharper, more bitter flavour and soften to a less pleasant texture when roasted than their ripe counterparts. Every photograph of fajitas uses colourful peppers for good reason - the flavour difference is real. Use red, yellow, and orange peppers only.
FAQ
Q: Can I use corn tortillas instead of flour?
Yes - corn tortillas are more authentic to the Mexican tradition and are naturally gluten-free. They are smaller, slightly denser, and more fragile when cold. Warm them directly over a gas flame (20 seconds per side) or in a dry pan over high heat - they need more heat than flour tortillas to become pliable. Wrap in a clean cloth as they come off the flame to keep warm and flexible.
Q: My filling is watery and pale. What went wrong?
The pan was overcrowded - the moisture from the peppers and chicken pooled rather than evaporating. Use two pans next time. Also check that the oven temperature was genuinely at 220°C before the food went in - at lower temperatures, moisture doesn't evaporate fast enough for browning to occur before the filling is cooked.
Q: How do I reheat leftover fajita filling?
A very hot dry pan, no oil, for 3-4 minutes tossing constantly. This reheats the filling and re-develops some of the char. Do not microwave - it produces soggy, steamed filling. Leftover filling also works excellently in burritos, quesadillas, or on top of rice for a quick lunch.
Q: What's the best salsa to serve alongside?
The Salsa Verde from the Street Food Sauce Bible is the best homemade option - it takes 10 minutes and is dramatically better than anything from a jar. A simple fresh tomato salsa (diced tomatoes, red onion, lime, salt, coriander) also works excellently. For heat, the Fermented Hot Sauce from the fermentation collection adds a complex depth that shop-bought hot sauce can't match.
🔗 Continue Cooking
Latest