Sourdough Starter from Scratch: The 7-Day Guide
Flour, water, and the wild yeast in your kitchen - the living culture that leavens bread without any help from a packet
A sourdough starter is one of the oldest biotechnologies in human history. It is also one of the most satisfying things to make in a kitchen, because making it means making something genuinely alive - a community of wild yeast and lactic acid bacteria that you cultivate, feed, and maintain, and that repays you with the ability to leaven bread, the most fundamental food there is, without any commercial input whatsoever.
The process sounds complicated. It is not. Flour and water, combined at room temperature, capture wild yeast and bacteria from the environment - from the flour itself, from the air, from your hands. Given warmth and regular feeding, these microorganisms establish a thriving, self-sustaining community. Within seven days, that community is active enough to raise bread.
Within a year, it is something more than that - a culture with its own character, shaped by your flour, your water, your kitchen's specific microorganism population. Sourdough starters are passed between bakers the way family recipes are passed between generations. Some are decades old. The starter you make this week, maintained with care, could outlast you.
This is the seven-day guide. Day by day, with the science behind what's happening, troubleshooting for every situation, and the discard recipes that make the feeding process feel like abundance rather than waste.
📖 The science behind this recipe: A sourdough starter is both a lactic acid fermentation (LAB producing lactic and acetic acids) and an alcoholic fermentation (wild yeast producing CO2 and ethanol). The interaction between these two populations - each supporting the other - is what makes sourdough different from any commercial yeast product. Full science at The Science of Fermentation: What's Actually Happening in Your Jar.
What You Are Actually Making
A sourdough starter is a culture - a living ecosystem of wild yeast (primarily Saccharomyces cerevisiae and other wild yeast species) and lactic acid bacteria (primarily Lactobacillus sanfranciscensis and related species) that exist in a symbiotic relationship within a flour-water paste.
The yeast produce: CO2 (which leavens bread) and ethanol (which contributes flavour and evaporates during baking).
The LAB produce: Lactic acid and acetic acid - the compounds that give sourdough its characteristic tang. Lactic acid produces a mild, yogurt-like sourness. Acetic acid produces a sharper, more vinegary tang. The ratio of the two is determined by temperature, hydration, and fermentation time - the variables that every sourdough baker learns to manage.
The symbiosis: The LAB acidify the environment, which inhibits organisms that would compete with the wild yeast. The yeast produce CO2 and some nutrients that support the LAB. Together, they create a stable, self-regulating community that, once established, is remarkably robust and resistant to contamination.
Where the microorganisms come from: Both flour and the surrounding environment. Whole wheat and rye flour have higher populations of wild yeast and LAB on the bran surface, which is why they establish starters faster than white flour. The specific combination of microorganisms in your starter will reflect your flour, your water, and your kitchen - which is why starters from different kitchens, even using the same flour, develop different flavour profiles.
Ingredients and Equipment
Ingredients:
- Whole wheat or rye flour - for the first 3-4 days of establishment. The bran surface carries the highest population of wild yeast and LAB; starting with whole grain flour accelerates the initial establishment significantly.
- Strong white bread flour - for feeding from day 4 or 5 onwards, once the culture is established. White flour produces a milder, more predictable starter.
- Unchlorinated water - filtered, or tap water left to stand for 30 minutes. Chlorine inhibits the bacteria and yeast you are trying to cultivate.
Equipment:
- A 500ml or larger glass jar - you need to see what's happening
- A digital kitchen scale - essential for consistent feeding ratios
- A rubber band or tape marker - to mark the level after each feeding, so you can see whether the starter has risen
- A loose cover - a piece of muslin, a loose-fitting lid, or a coffee filter secured with a rubber band. The starter needs to breathe but needs protection from debris.
The Feeding Ratio
The most important concept in sourdough maintenance is the feeding ratio - the proportion of existing starter to fresh flour and water added at each feeding.
Standard ratio: 1:1:1 - 1 part existing starter : 1 part flour : 1 part water (by weight)
So for a 50g batch: discard all but 50g of starter, add 50g flour and 50g water.
Higher ratios (1:2:2, 1:3:3, 1:5:5) - more fresh flour per unit of existing starter. The starter rises more slowly (more food per unit of culture) but has more fuel to consume before becoming exhausted. Used for longer fermentation schedules, overnight levains, or when the starter is very active and over-fermenting between feedings.
Why you discard: Feeding without discarding rapidly produces enormous quantities of starter. More importantly, without discarding, the acid accumulation between feedings eventually inhibits the yeast and LAB you are trying to maintain. Discarding resets the culture and gives the fresh flour and water room to ferment productively.
The 7-Day Guide
Day 1: The Beginning
What to do: In a clean jar, combine:
- 50g whole wheat or rye flour
- 50g unchlorinated water at room temperature
Mix until completely smooth - no dry flour. The mixture will be thick, like a paste. Scrape down the sides, cover loosely, and leave at room temperature (ideally 21-24°C).
Mark the level with a rubber band or tape.
What to expect: Nothing dramatic for the first 24 hours. The mixture may smell faintly of flour and water. This is correct.
Day 2: First Signs
What to do: Look at the jar. Does the mixture look different - any small bubbles, any slight rise? These are the first signs of microbial activity.
Feed regardless of activity:
- Discard all but 50g of the mixture
- Add 50g whole wheat/rye flour + 50g water
- Stir thoroughly, cover loosely, mark the level
What to expect: Possibly small bubbles in the mixture or a slight rise. Possibly nothing visible yet - particularly in cooler kitchens. The mixture may smell faintly sour or slightly unpleasant (this is normal at this stage - not the LAB you want, but the initial population of other bacteria that will be outcompeted as the pH drops).
Day 3: The Smell Phase
What to do: Feed the same way as Day 2: discard to 50g, add 50g flour + 50g water.
What to expect: This is the day that most beginners panic. The starter may smell strongly unpleasant - cheesy, acetone-like, strongly alcoholic, or vaguely like nail polish remover. This is completely normal and a sign that fermentation is active.
Why this happens: The initial population of bacteria on the flour is not primarily LAB - it includes other organisms (Leuconostoc species and others) that produce compounds with strong, sometimes unpleasant smells. As the pH drops (due to acid production) and the LAB establish dominance, these organisms are outcompeted and their contributions to the smell diminish.
Do not discard the starter because it smells bad on Day 3. This is the most common premature abandonment point. The smell is a sign of active fermentation, not failure.
Day 4: The Transition
What to do: Switch from whole wheat/rye to strong white bread flour for the feeding (or continue with whole wheat if you prefer a more sour starter):
- Discard to 50g
- Add 50g strong white flour + 50g water
What to expect: By Day 4, one of two things is happening:
- Active: The starter has clearly risen since the last feeding, doubled or more in volume, and developed a domed surface that is starting to fall back. The smell has shifted toward something more pleasant - yeasty, slightly sour, beginning to smell like bread dough.
- Slow: Little visible rise, still smelling funky. This is still normal, particularly in cooler kitchens or with some flour types. Continue feeding.
Day 5: Growing Confidence
What to do: Feed as Day 4 - discard to 50g, add 50g white flour + 50g water.
What to expect: In a warm kitchen (22°C+), a healthy starter should be showing clear, reliable rise by now - doubling or more in volume within 4–8 hours of feeding. The smell should be clearly pleasant: yeasty, slightly sour, with the characteristic fresh-bread quality of an active culture.
If the starter is rising reliably, you can begin feeding twice daily (once in the morning, once in the evening) to build strength and activity.
Day 6: Testing for Readiness
What to do: Feed as previous days.
The float test: Approximately 4-6 hours after feeding, drop a small spoonful of starter into a glass of water. If it floats, the culture is active enough to leaven bread - the CO2 bubbles trapped in the culture give it buoyancy. If it sinks, it is not yet ready; continue feeding for another day.
The peak and timing: Watch when the starter reaches its peak - the highest point of the rise before it begins to fall. The time from feeding to peak is the "rise time" - typically 4-8 hours at room temperature. This is also the optimal time to use the starter in a bread recipe (when it is at its most active and its yeast population is highest).
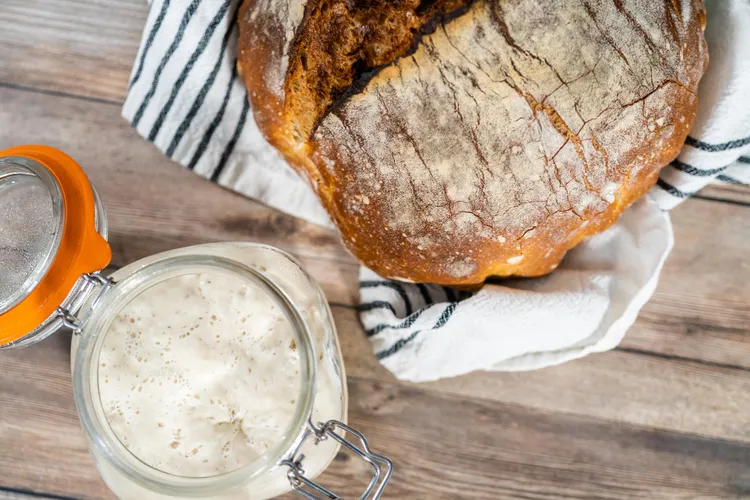
Day 7: Ready
What it should look, smell, and taste like:
- Appearance: Doubled or more in volume after feeding, with a domed, bubbled surface. Visible bubbles throughout the culture, not just on the surface.
- Smell: Yeasty, slightly sour, pleasantly complex - like a good craft beer or fermented apple juice. Not nail polish, not cheese, not rot.
- Taste: Tangy, slightly sour, with a pleasant yeast flavour. Not unpleasant.
- Texture: Light and airy - when you stir it, it feels bubbly and alive.
If your starter passes the float test and doubles consistently after feeding, it is ready to use in a bread recipe.
If it's not there yet: Some starters take 10-14 days to fully establish, particularly in cool kitchens or with more refined flour. Continue feeding daily and be patient. The culture will arrive.
Long-Term Maintenance
Regular Baking (Weekly)
If you bake weekly, keep the starter at room temperature and feed daily (or twice daily for very active starters). The 1:1:1 ratio is standard. Each feeding produces discard - the portion removed before adding fresh flour.
Occasional Baking (Monthly)
If you bake monthly or less, refrigerating the starter between uses is the most practical approach. A refrigerated starter can go 1-2 weeks between feedings. The cold significantly slows the culture - it remains alive but metabolically dormant.
Reviving from the refrigerator:
- Remove from the fridge 24 hours before you want to bake
- Feed once: discard to 50g, add 50g flour + 50g water
- Leave at room temperature for 8-12 hours
- Feed again and allow to reach peak activity before using
After 2 feedings at room temperature, a healthy refrigerated starter should be fully active.
Long-Term Storage (Months)
Drying the starter: Spread a thin layer of active starter on parchment paper and allow to dry completely at room temperature (12-24 hours). Break into flakes, store in an airtight jar. Dried starter keeps for 1-2 years. Revive by dissolving in water and feeding as a new starter - it typically activates within 3-5 days.
Freezing the starter: Freeze a portion of active starter in an airtight container for up to 3 months. Thaw in the refrigerator overnight, then feed as above to revive.
Always maintain a backup of your starter in a different location from your main culture - a dried backup in the back of the cupboard, or a frozen portion in the freezer. This protects against the occasional disaster (a dropped jar, a contaminated culture, a forgotten starter that has starved).
Troubleshooting
My starter isn't rising after 7 days. Check: (1) Kitchen temperature - below 18°C significantly slows establishment. Move to a warmer location (near the oven, on top of the refrigerator). (2) Flour - bleached white flour has fewer wild yeast and LAB. Switch to whole wheat or rye for 2-3 days. (3) Water - if you haven't been using filtered or de-chlorinated water, switch now. (4) Feeding frequency - try feeding twice daily for 3-4 days.
My starter smells like nail polish remover / acetone. This is excess acetic acid production - typically from a culture that is hungry (being underfed or in a very warm kitchen that is burning through the food quickly). Feed more frequently (every 12 hours), or increase the feeding ratio to 1:2:2 to give the culture more fuel.
My starter has a dark liquid layer on top. This is "hooch" - a layer of alcohol (ethanol) produced by the yeast when the starter is hungry. It looks alarming but is harmless. Stir it back in or pour it off, then feed. The presence of hooch indicates the starter needs more frequent feeding.
There's pink or orange discolouration in the starter. Discard immediately. Pink or orange colouration indicates contamination by bacteria or fungi that are not normal components of a healthy starter. Start fresh.
The starter smells like cheese or yogurt (not bread). The LAB are dominating; the yeast population is lower than ideal. This often happens in a very cool environment. Move to a warmer location and switch to feeding twice daily for a week. The yeast should re-establish relative to the LAB.
My starter was active last week but seems sluggish this week. Starters fluctuate with kitchen temperature, flour changes, and the season. Refresh by feeding twice daily for 3-4 days at room temperature. If you've been refrigerating it, bring to room temperature and give it 2-3 feedings before pronouncing it sluggish.
Discard Recipes: Making Waste Worthwhile
Every feeding produces discard - the portion of starter removed before adding fresh flour. At 1:1:1 feeding, a single feeding produces approximately 50g of discard. Fed daily, that's 350g per week. Used thoughtfully, discard is a valuable ingredient rather than a waste product.
Sourdough Discard Pancakes
The fastest and most satisfying discard recipe. Combine 150g discard with 1 egg, 1 tbsp melted butter, 1 tbsp sugar, ½ tsp baking soda, and a pinch of salt. Cook in a buttered pan over medium heat. The tang of the starter and the lift from the baking soda produce pancakes that are noticeably more complex and flavourful than any standard recipe.
Sourdough Discard Flatbreads
100g discard + 100g flour + 1 tbsp olive oil + pinch of salt. Knead briefly, rest 20 minutes, roll thin, cook in a dry pan 2 minutes per side. The discard provides flavour and a slight tang; the fresh flour provides structure. Serve immediately with hummus, labneh, or alongside soups.
Sourdough Discard Crackers
Mix 200g discard with 2 tbsp olive oil, 1 tsp each rosemary and sea salt. Roll very thin on a baking sheet, cut into squares or rectangles, bake at 180°C for 15-20 minutes until crispy. Extraordinary with cheese. Keep in an airtight tin for up to 1 week.
Sourdough Discard Pizza Base
150g discard + 200g flour + 1 tsp salt + 1 tbsp olive oil + enough water to bring together (approximately 80ml). Knead 5 minutes, rest 30 minutes, roll thin. The discard provides flavour but not sufficient leavening for a thick pizza base - for thin-crust pizza it is excellent.
Sourdough Discard Waffles
200g discard + 1 egg + 30g melted butter + 1 tbsp sugar + ½ tsp baking soda. Cook in a waffle iron. The tang of the starter and the crispness of the waffle iron surface produce waffles that are leagues better than standard commercial waffle mix.
Hydration: Understanding Your Starter's Consistency
The hydration of a starter - the ratio of water to flour by weight - affects its activity, its flavour, and how it behaves in recipes.
100% hydration (equal parts flour and water by weight): The standard in this guide. A thick, paste-like consistency. Produces a balance of lactic and acetic acid. The most common starter format in home baking.
Higher hydration (125-150%): More liquid consistency. More active and faster-peaking. Produces more lactic acid (milder sourness). Easier to mix into bread dough.
Lower hydration (50-75%, "stiff starter"): Firm, dough-like consistency. Slower fermentation. Produces more acetic acid (sharper sourness). The format used traditionally in San Francisco sourdough and some Italian panettone starters.
The recipe in this guide uses 100% hydration. Once your starter is established, you can experiment with different hydrations to explore their effects on flavour.
Pro Tips
- Use the same flour for maintenance. Once your starter is established on a specific flour, changing to a significantly different flour (from whole wheat to white, from one brand to another) temporarily disrupts the culture. It recovers quickly, but consistent flour produces the most consistent results.
- Smell it every day. The progression from unpleasant to pleasant is the clearest indicator of a healthy establishment. Learning this smell spectrum is one of the most valuable sensory skills in fermentation.
- Name your starter. This sounds frivolous; it is actually practical. A named starter is a starter you think of as something you maintain rather than something you store. The emotional investment is real and produces better care. The sourdough community takes starter names with complete seriousness.
- Mark the level after every feeding. The rubber band or tape mark shows you exactly how much the starter has risen and when it peaked. This information is what tells you whether it's ready to use and when your next feeding should be.
- Keep a feeding log for the first two weeks. Date, time, what you fed, what you observed. Two weeks of notes gives you a picture of your specific starter's behaviour that guides every future decision.
Common Mistake: Using Bleached White Flour for the First Feeding Bleached flour has been treated with chemical agents that significantly reduce the population of wild yeast and LAB on the flour surface - the very organisms you are trying to capture. Starting with bleached flour produces a slower, more uncertain establishment. Use whole wheat or rye flour for the first 3-4 days (the bran surface carries the highest organism population), then transition to unbleached white bread flour for ongoing maintenance. This single change can reduce establishment time from 14 days to 7.
FAQ
Q: Can I use all-purpose flour instead of bread flour?
Yes - the difference is in protein content. Bread flour (12-14% protein) produces a more elastic starter that holds structure better. All-purpose flour (10-12% protein) works well and is the standard in many countries. The starter's activity is primarily determined by the flour's microbial population (whole grain vs white) rather than its protein content.
Q: My starter doubled on Day 4 but seems slower now. Is it failing?
No - this common phenomenon is called the "Day 4 fall." The initial rise on Day 4 is often driven by Leuconostoc species (bacteria that produce CO2 but are not ideal for bread leavening) rather than wild yeast. These organisms are outcompeted by LAB as the pH drops, producing a temporary lull. By Day 6-7, the true wild yeast population establishes and the starter rises reliably again.
Q: How much discard should I keep?
As little as possible while keeping the culture alive. Most home bakers maintain 50-100g of starter - enough for a feeding and a bread recipe. There is no value in maintaining a large quantity of starter if you bake infrequently; more starter requires more flour to feed.
Q: Can I speed up the establishment process?
Yes - several techniques accelerate it: (1) Use whole rye flour for the first 3-4 days (highest wild yeast and LAB population). (2) Ferment at 24–26°C rather than 21°C - the warmth accelerates microbial activity. (3) Add a small amount of ripe fruit (a few raisins, a chunk of apple) to the first feeding - the natural yeasts on fruit skin help inoculate the starter.
Q: What does the starter smell like when it's healthy and ready?
A healthy, active starter smells yeasty - like beer, wine, or fresh bread dough, with a pleasant sourness underneath. It is a smell that most people find appetising rather than off-putting. The transition from the unpleasant smell of the first few days to this pleasant, complex smell is the most reliable indicator that the culture has established successfully.
🔗 Continue Fermenting
- Sauerkraut: The Easiest Ferment You'll Ever Make
- How to Make Kimchi: The Complete Beginner's Guide
- Water Kefir: The Fizzy Probiotic Drink You Can Make in 48 Hours
- The Science of Fermentation: What's Actually Happening in Your Jar
- How to Build a Fermentation Weekly Routine
- Fermentation & Gut Health at Home: The Ultimate Guide
Latest