How to Make Perfect Pie Crust Every Time (Even If You’re a Beginner)
A truly perfect pie crust can feel like baking magic - flaky, buttery, tender, and just sturdy enough to hold any filling you dream up. But despite its reputation, mastering pie dough is far easier once you understand a few key principles that bakers rely on. With the right techniques and a little confidence, even beginners can create pie crusts that look and taste like they came straight from a professional kitchen.
There’s something undeniably magical about a perfect pie crust - shatteringly flaky, buttery without being greasy, golden without being tough, and sturdy enough to hold its filling without turning soggy. Yet for many home bakers, pie crust can feel like the most intimidating part of baking. The good news? Mastering a perfect pie crust isn’t about secret chef tricks or complicated steps. It’s about understanding a few fundamental techniques, choosing the right ingredients, and handling your dough with confidence. Once you know what each step is doing, making tender, flaky pie crust becomes not only achievable but genuinely enjoyable.
The heart of great pie crust begins with the type of fat you choose - whether it’s butter for rich flavor, shortening for tender texture, lard for exceptional flakiness, or a blend for the best of all worlds. Butter remains the classic choice for its taste, but its water content creates steam pockets that give the crust its signature flakes. This is why keeping your butter cold is non-negotiable. When fat melts before reaching the oven, it blends into the flour, creating dense, tough crust instead of layers. That’s why recipes often sound dramatic about the “ice-cold butter” requirement - it genuinely affects the structure of your crust. Using chilled ingredients, from butter to water to even your mixing bowl on hot days, instantly increases your chances of success.
But fat isn’t the only player in the game. The way you incorporate it into your flour determines what kind of crust you end up with. Cutting fat into flour until it forms pea-sized bits gives you flakiness, while a finer, sandier texture results in a tender, shortbread-like crust. The trick is to mix just enough to distribute the fat without breaking it down too much. Overmixing is the classic beginner mistake because it quickly develops gluten - the same protein network that makes bread chewy but turns pie crust tough. The more you handle the dough, the more gluten forms, which is why gentle mixing and minimal kneading produce a delicate, tender crust.
Then there’s water, which seems simple but plays a huge role in pie crust success. Too much water leads to stickiness and toughness, while too little water causes cracks and breaks when you try to roll it out. The secret is adding just enough ice-cold water, one tablespoon at a time, until the dough holds together when you gently squeeze it. It should look a little shaggy and imperfect - that’s exactly what you want. Those rough edges turn into layers in the oven.
Once your dough comes together, one of the most overlooked steps is letting it rest in the refrigerator. Chilling the dough has a double benefit: it re-solidifies your fat (essential for flakiness) and relaxes the gluten that formed during mixing, which prevents shrinking in the oven. Even a quick 30-minute chill can make the difference between a flawless crust and one that slumps down the sides of your pie pan. Rested dough is easier to roll, easier to lift, and easier to shape.
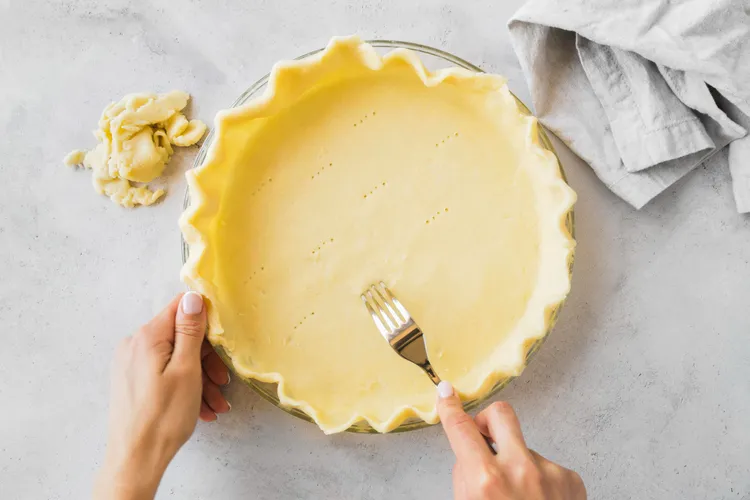
Rolling out pie dough is another moment where beginner bakers get nervous, but the trick is simpler than it seems. Lightly flour your surface, rotate the dough a quarter turn after each roll, and work from the center outward for even thinness. If the dough cracks, don’t panic - patching is totally normal. If it gets too warm and sticky, slide it back into the fridge for a few minutes. Patience keeps the dough workable and prevents tearing and sticking. And when you transfer it to the pie pan, avoid stretching it. Stretching causes the dough to recoil in the oven, leading to shrinking and misshapen edges. Instead, gently drop it into place and let it settle naturally.
Blind baking is another technique that elevates your crust to bakery level, especially for custard pies or no-bake fillings. Lining your dough with parchment paper and filling it with pie weights or dried beans prevents it from puffing up or slipping down the sides. The result is a crisp, well-structured base that will never turn soggy. For fruit pies, a brush of egg wash or a sprinkle of flour-sugar mixture helps control moisture and creates a barrier between juicy fillings and your carefully crafted crust.
And finally, temperature plays a starring role in pie crust performance. A hot oven helps the fat steam rapidly, creating those beautiful, laminated layers. Starting your pie at a high temperature before lowering it partway through the bake helps lock in structure and browning. Keeping your ingredients cold and the oven hot is one of the simplest but most powerful rules of pie crust success.
Once you understand how each element of your dough behaves, mastering pie crust suddenly feels less like an intimidating challenge and more like a satisfying craft. With cold ingredients, careful mixing, adequate chilling, gentle rolling, and thoughtful baking, even a total beginner can turn out a crust that looks - and tastes - like it came from a bakery. And the more you practice, the more intuitive it becomes. Before long, you’ll have your own favorite fat blends, rolling rituals, and finishing touches, making perfect pie crust not just something you can do, but something you truly enjoy.
Latest