Passionfruit ripple ice cream
This Passionfruit Ripple Ice Cream features a creamy base with a tropical twist, blending lush creams and coconut milk with a tangy passionfruit sauce. The result is a refreshing dessert that's perfect for warm days.
Cook time 20 min
Prep time 20 min
Ingredients:
2 cups heavy whipping cream1 cup coconut milk
1 cup milk (1% fat)
1 egg
1/4 cup sugar
2 passion fruits
1 tbsp butter
1 tbsp lemon juice
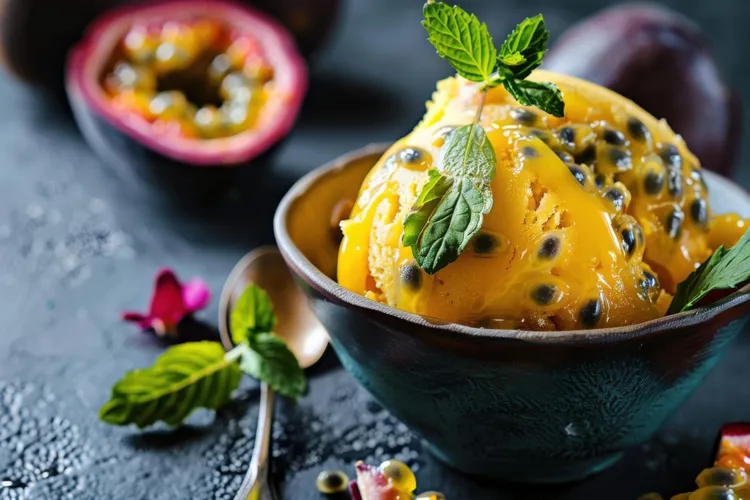
Passionfruit ripple ice cream is a delightful and refreshing dessert that combines the rich creaminess of traditional ice cream with the tart and tangy flavor of passion fruits. This recipe uses a blend of heavy whipping cream, coconut milk, and milk to create a smooth base, enhanced with a swirl of passionfruit that offers a burst of tropical flavor in every bite.
Instructions:
- Cut the passion fruits in half and scoop out the pulp into a small saucepan.
- Add 1 tablespoon of sugar and the lemon juice to the saucepan.
- Simmer over medium heat, stirring occasionally, until the mixture thickens slightly (about 5-7 minutes).
- Remove from heat and let it cool completely. Set aside.
- In a medium-sized saucepan, combine the heavy whipping cream, coconut milk, and milk. Heat over medium heat until it starts to simmer (do not let it boil).
- In a separate bowl, whisk together the egg and the remaining sugar until well combined and slightly pale in color.
- Slowly add about 1 cup of the hot milk mixture to the egg mixture, whisking constantly to temper the eggs.
- Pour the tempered egg mixture back into the saucepan with the rest of the milk mixture.
- Cook over medium-low heat, stirring constantly, until the mixture thickens and coats the back of a spoon (about 5-6 minutes). Do not let it boil.
- Remove the saucepan from the heat and stir in the butter until fully melted and incorporated.
- Let the mixture cool to room temperature, then refrigerate until fully chilled (preferably overnight).
- Once the ice cream base is chilled, pour it into an ice cream maker and churn according to the manufacturer’s instructions.
- When the ice cream is almost done churning, slowly drizzle the cooled passionfruit sauce into the ice cream. Allow the sauce to create ripples by pouring it in stages and letting the ice cream maker distribute it.
- Transfer the churned ice cream to an airtight container.
- Freeze for at least 4 hours, or until firm.
- Scoop the ice cream into bowls or cones and enjoy the refreshing tropical flavor of passionfruit ripple ice cream!
Creating passionfruit ripple ice cream at home is a rewarding experience that results in a creamy, tangy dessert perfect for hot summer days or as a special treat year-round. By following the steps and tips provided, you can enjoy a homemade ice cream that rivals any store-bought version, with the added satisfaction of using fresh ingredients and customization.
Passionfruit ripple ice cream FAQ:
After churning, transfer the ice cream to an airtight container and freeze for at least 4 hours, or until it becomes firm enough to scoop.
Yes, you can substitute coconut milk with whole milk for a creamier texture or almond milk for a non-dairy option. However, this may alter the flavor profile slightly.
The ice cream base is ready when it thickens enough to coat the back of a spoon. This usually takes about 5-6 minutes over medium-low heat.
If the passionfruit sauce is too runny, simmer it longer over medium heat until it thickens to your desired consistency. Keep stirring to prevent burning.
Homemade ice cream can be stored in the freezer for up to 2-3 weeks. Make sure it's in an airtight container to prevent freezer burn.
Cooking Tips:
- Use fresh passion fruits: For the best flavor, use fresh passion fruits. If fresh ones are unavailable, you can use passionfruit puree but make sure it is 100% pure without added sugars.
- Chill ingredients: Ensure all your ingredients, especially the cream and passionfruit mixture, are well-chilled before combining. This helps the ice cream churn correctly and achieve a smooth texture.
- Strain passionfruit seeds: If you prefer a smoother texture, strain the passionfruit pulp to remove the seeds before adding it to the ice cream mixture.
- Don't skip the churning process: Churning is essential to incorporate air into the mixture, creating a light and creamy texture. If you don't have an ice cream maker, you can mix it vigorously by hand every 30 minutes for 2-3 hours as it freezes.
- Butter adds richness: The addition of butter in this recipe helps to give the ice cream a richer mouthfeel, so don't skip this step.
- Store properly: After making your ice cream, store it in an airtight container in the freezer to prevent ice crystals from forming and keep it creamy.
Nutrition Facts
8 ServingsCalories 330kcal
Protein 4.32g
Carbohydrates 13g
Fiber 1.67g
Sugar 12g
Fat 30g
More recipes
Coconut cream berry delight with chocolate candies
Enjoy a creamy Coconut Cream Berry Delight with chocolate candies.
05 May 2026Vanilla cream easy dessert
A quick and creamy vanilla dessert, perfect for any occasion.
05 May 2026Chocolate freckle cakes
Delightful chocolate freckle cakes topped with cream cheese frosting.
05 May 2026White chocolate cream and strawberry mille-feuille
A delightful layered dessert of puff pastry, white chocolate cream, and strawberries.
05 May 2026Grilled strawberries with white chocolate cream
Enjoy grilled strawberries topped with creamy white chocolate.
05 May 2026