The simple cooking method that transforms everyday meals
There’s a reason restaurant food often feels more satisfying than home cooking - texture.
A golden crust. A tender center. Vegetables that crackle slightly when bitten. Chicken that stays juicy even after browning.
That contrast between crispy exterior and moist interior is what makes food memorable.
The good news?
This result isn’t about expensive equipment or complicated recipes. It comes down to understanding a simple cooking formula used across professional kitchens.
Once you learn it, it works for almost everything:
-
chicken
-
steak
-
fish
-
potatoes
-
tofu
-
roasted vegetables.
Let’s break it down.
Why Food Turns Dry or Soggy at Home
Most cooking problems fall into two categories.
Problem 1: No Browning
Food releases moisture and steams instead of crisping.
Result:
Soft texture and pale color.
Problem 2: Overcooking
Trying to achieve crispiness cooks the interior too long.
Result:
Dry meat or mushy vegetables.
The solution is balancing heat, moisture, and timing.
The Crispy Outside, Juicy Inside Formula
Professional cooks follow four main steps:
-
Remove surface moisture
-
Use high initial heat
-
Avoid overcrowding
-
Finish cooking gently.
Simple principles - powerful results.
Step 1: Dry Food Before Cooking (The Most Important Step)
Moisture is the enemy of crispiness.
Water must evaporate before browning begins.
If food goes into a pan wet, it steams.
Always:
-
pat meat dry with paper towels
-
dry vegetables after washing
-
allow proteins to sit uncovered briefly in the fridge.
This alone dramatically improves results.
Why it works:
Browning happens through the Maillard reaction - which requires dry heat.
Step 2: Salt at the Right Time
Salt affects both texture and moisture.
Early Salting (Best for Meat)
Salt 20-40 minutes before cooking.
It initially draws moisture out, then reabsorbs it back into the meat.
Result:
Better seasoning and juicier interior.
Immediate Salting
Works when short on time but slightly reduces benefit.
Avoid salting moments before cooking if moisture appears on the surface.
Step 3: Preheat Properly (Most Skipped Step)
Cold pans ruin crust formation.
Your pan should already be hot before food touches it.
Signs the pan is ready:
-
oil shimmers
-
gentle heat waves appear.
Food should sizzle immediately.
That sound equals evaporation and browning.
Step 4: Don’t Move the Food Too Soon
Many cooks flip too early.
When food sticks, it usually means crust hasn’t formed yet.
Wait.
Once browning develops, food releases naturally.
This creates:
-
deeper flavor
-
better texture
-
even cooking.
Patience creates crispness.
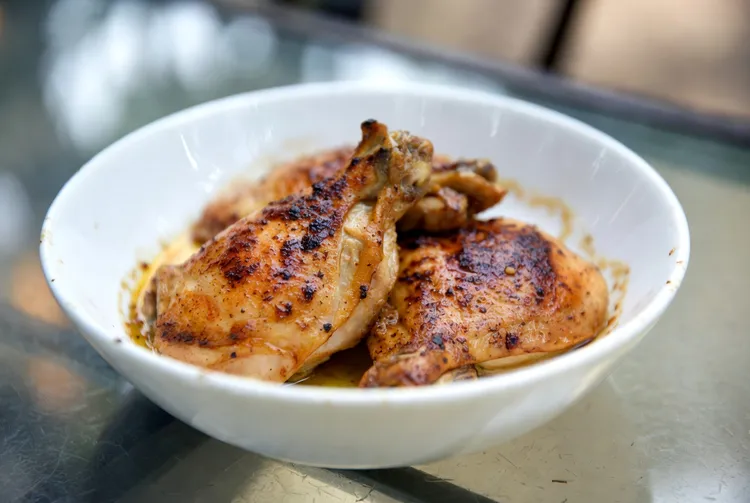
Step 5: Control Heat After Browning
Here’s the real secret.
High heat creates crust.
Lower heat finishes cooking.
Example:
Sear chicken or steak first → reduce heat or move to oven.
This prevents burning while allowing juices to stay inside.
Restaurants use this constantly.
Pan Cooking vs Oven Cooking
Both achieve crispy results differently.
Pan Cooking
Best for:
-
steaks
-
chicken breasts
-
fish fillets.
Fast crust formation.
Oven Roasting
Best for:
-
potatoes
-
vegetables
-
bone-in chicken.
Dry circulating heat creates even crisping.
Combining both methods often works best.
The Oil Factor: Choosing the Right Fat
Oil helps heat transfer.
But type matters.
Best options:
-
neutral vegetable oil
-
sunflower oil
-
avocado oil.
Butter alone burns quickly.
Chef trick:
Start with oil, finish with butter for flavor.
The Airflow Secret for Crispy Roasting
Vegetables often turn soggy because trays are overcrowded.
Instead:
Leave space between pieces.
Hot air must circulate.
Crowding traps steam.
One large tray works better than two crowded ones.
Thickness Changes Everything
Thin foods cook quickly but dry easily.
Thick foods brown beautifully but need finishing time.
Solution:
Adjust heat strategy.
Thin cuts → medium-high heat quickly.
Thicker cuts → sear then finish gently.
The Resting Step (Often Ignored)
Juices move during cooking.
Cutting immediately releases moisture onto the plate.
Rest food briefly:
-
chicken: 5 minutes
-
steak: 5-10 minutes.
Juices redistribute.
Interior stays juicy.
Crispy Vegetables Use the Same Formula
Perfect roasted vegetables follow identical rules.
-
Dry completely.
-
Oil lightly.
-
Spread evenly.
-
Roast hot (around 220°C / 425°F).
Caramelization creates flavor and texture simultaneously.
Air Fryer vs Pan vs Oven
Each method can achieve the formula.
| Method | Strength |
|---|---|
| Pan | Fast crust |
| Oven | Even cooking |
| Air fryer | Maximum airflow crispiness |
Air fryers succeed because circulating air removes moisture quickly.
Common Mistakes That Ruin Texture
Turning Heat Too Low
Food steams.
Overcrowding the Pan
Moisture builds instantly.
Constant Flipping
Prevents crust formation.
Too Much Oil
Creates frying instead of searing.
Small adjustments make huge differences.
The 10-Minute Weeknight Version
Short on time?
Follow this quick version:
-
Pat food dry.
-
Heat pan properly.
-
Sear undisturbed.
-
Lower heat to finish.
Even simple meals improve dramatically.
Why Restaurants Get This Right Consistently
Professional kitchens control:
-
moisture
-
temperature
-
timing.
Not complicated recipes.
Technique creates texture.
And texture creates satisfaction.
Texture Is the Real Flavor Upgrade
Great cooking isn’t always about adding more ingredients or seasoning.
Often, it’s about contrast.
Crispy outside. Juicy inside.
Once you understand this formula, everyday meals - from roasted vegetables to simple chicken dinners - start tasting noticeably better.
Because sometimes the difference between ordinary and restaurant-quality food is just a few small habits done correctly.