Enriched Dough: Brioche, Cinnamon Rolls, and Enriched Loaves
The bread that lives between bread and cake - and the butter incorporation technique that makes it extraordinary
Enriched dough is bread dough that has been enriched with fat and eggs - additions that transform the final product from lean, chewy, open-crumbed bread into something that is soft, slightly sweet, pull-apart tender, and occupies the delicious middle ground between bread and cake. Brioche is the classic. Cinnamon rolls are the most beloved. Enriched milk loaves, Chelsea buns, burger buns - all come from variations of the same base dough.
The enrichment changes everything: the texture (from chewy to pillow-soft), the flavour (from plain and yeasty to buttery and slightly sweet), the shelf life (fat and eggs extend freshness significantly), and the technique required to make it. This last point is where most home bakers encounter difficulty - specifically the butter incorporation step, where cold butter is beaten into fully developed dough until completely absorbed. It looks wrong during the process. The dough becomes sticky and soft and seems to regress. And then, gradually, it comes back together into a smooth, elastic, deeply enriched dough that springs back to the touch and smells extraordinary.
This guide covers the technique, the brioche, the cinnamon rolls, and the overnight method that makes both achievable on a weekday.
The Enrichment Technique: Why Butter Is Added Last
In a lean bread (baguette, sourdough, focaccia), the gluten develops first and the fat, if present, is added at the beginning - a small amount that slightly inhibits gluten development and produces a somewhat tender crumb.
In enriched dough, a large amount of butter is added, but crucially - after the gluten has fully developed. The reason: fat inhibits gluten formation. If large amounts of butter are added at the start of mixing, the fat coats the flour particles before gluten can form. The result is a dough that never develops adequate structure - it is soft and greasy and cannot hold the gas produced by yeast.
The solution: develop the gluten completely first (knead the lean dough until it passes the windowpane test), then incorporate the butter in small additions. Each addition of butter partially disrupts the gluten network - the dough becomes sticky and unruly - then the continued beating reorganises the gluten around the incorporated fat. By the time all the butter is incorporated, the gluten is fully developed and the fat is evenly distributed throughout.
The result is a dough that is simultaneously highly enriched and structurally capable - it can rise, it can hold its shape during the final proof, and it can produce the soft, pull-apart crumb that makes enriched dough worth the extra work.
The Base Enriched Dough
This dough makes both the brioche loaf and the cinnamon roll base - with minor adjustments.
Makes 1 × 900g brioche or 12 large cinnamon rolls | Active time: 30 minutes | Total time: 3-4 hours (or overnight)
Ingredients
- 400g strong white bread flour
- 7g instant dried yeast
- 60g caster sugar - more for sweet dough applications; less for savoury (burger buns: 20g)
- 1 tsp fine sea salt
- 4 large eggs, at room temperature, lightly beaten
- 60ml whole milk, warm
- 150g unsalted butter, at room temperature - not melted; just genuinely soft, pressing easily
Method
Step 1 - Develop the lean dough (10 minutes): Combine flour, yeast, sugar, and salt in the bowl of a stand mixer fitted with a dough hook. Mix briefly. Add the beaten eggs and warm milk. Mix on low until the dough comes together, then increase to medium and knead for 8-10 minutes until the dough is smooth, elastic, and passes the windowpane test. The dough will be quite stiff at this stage.
Without a stand mixer: Knead by hand for 12-15 minutes. Enriched dough is significantly more demanding to knead by hand than lean dough because of the eggs - the dough is very wet and sticky initially. A bench scraper and patience are essential.
Step 2 - Incorporate the butter (8-12 minutes): With the mixer running on medium-low, add the soft butter a tablespoon at a time. Wait for each addition to be largely incorporated before adding the next.
The sequence will look like this:
- After the first few additions: the dough softens dramatically and becomes sticky, almost slimy-looking. Correct.
- After half the butter: the dough is very soft and loose. Correct.
- After all the butter: with continued beating, the dough comes back together - it becomes smooth, glossy, elastic, and slightly tacky but not sticky. This transformation takes approximately 8-12 minutes of continued beating after the last butter addition.
The ready signs: The dough pulls cleanly away from the bowl sides, forms a smooth ball on the hook, passes the windowpane test again, and feels slightly tacky but not sticky when touched.
Step 3 - First prove (1-2 hours or overnight): Transfer to a lightly oiled bowl. Cover. Leave at room temperature for 1-2 hours until roughly doubled.
Alternatively - the overnight method (strongly recommended): After the first prove at room temperature (1 hour), refrigerate overnight (8-16 hours). Cold proving develops significantly more flavour and the chilled dough is much easier to shape than room-temperature enriched dough (which is soft and difficult to handle). Remove from the refrigerator 30 minutes before shaping.
Application 1: Brioche Loaf
Serves 8-10 | Second prove: 1.5-2 hours | Bake: 30 minutes at 180°C
Shape: Divide the proved dough into 8 equal pieces (approximately 80-90g each). Roll each into a tight ball, pulling the surface taut. Place the balls in two rows of four in a greased 900g loaf tin - they should just touch. Cover loosely and prove until the balls have expanded to fill the tin and risen visibly above the rim (1.5-2 hours at room temperature).
Bake: Brush gently with egg wash (1 egg + 1 tbsp milk). Bake at 180°C (fan) for 28–32 minutes until deep golden brown. The internal temperature should reach 90-93°C.
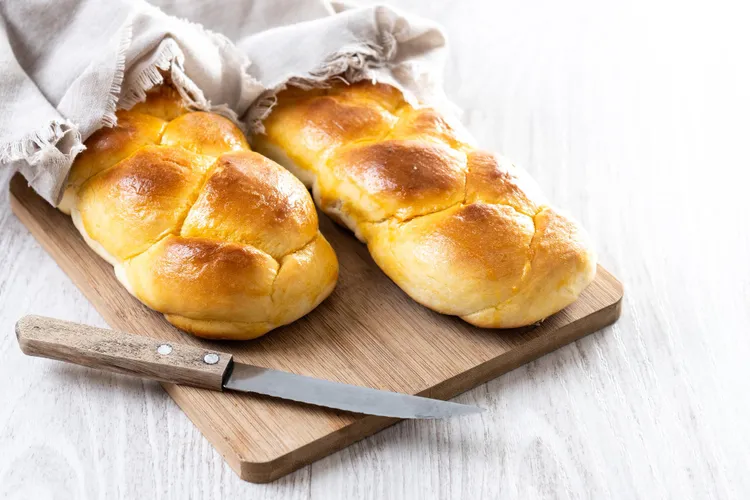
The loaf emerges as a pull-apart bread - the eight balls baked together can be separated at the table, which is one of brioche's greatest pleasures. A single slice cut from one ball is perfectly proportioned.
Storing: Brioche stales faster than lean bread because the fat content prevents retrogradation of the starch for longer but then it goes soft-stale quickly. Best eaten within 2 days. Day-old brioche makes extraordinary French toast - the rich, eggy bread absorbs the custard perfectly.
Application 2: Cinnamon Rolls
Makes 12 | Second prove: 1 hour | Bake: 22-25 minutes at 180°C
The Filling
- 80g unsalted butter, very soft
- 120g soft light brown sugar
- 2 tsp ground cinnamon
- ½ tsp ground cardamom (optional but exceptional - cardamom is one of the great cinnamon roll upgrades)
The Cream Cheese Glaze
- 200g cream cheese, at room temperature
- 150g icing sugar, sifted
- 3-4 tbsp whole milk - to achieve pourable consistency
- 1 tsp vanilla extract
Shape: On a lightly floured surface, roll the proved dough into a rectangle approximately 35×45cm. The dough should be approximately 5mm thick.
Spread the very soft butter over the entire surface, leaving a 2cm border along one long edge. Mix the brown sugar, cinnamon, and cardamom and scatter evenly over the butter.
Roll tightly from the long edge opposite the border, creating a firm log. Use the border edge (unbuttered) to seal - press firmly. The tighter the roll, the more defined the spiral in the finished rolls.
Cut the log into 12 equal rounds, approximately 3.5cm thick. A bench scraper or sharp knife produces cleaner cuts than a sawing motion.
Place the rounds in a buttered baking tin (30×20cm or similar), cut-side up, leaving small gaps between them (they will merge during the second prove).
Second prove: Cover loosely. Prove at room temperature for 1 hour until the rolls have expanded to touch each other and are clearly puffy. Alternatively: refrigerate overnight after shaping (the overnight cold prove means you can bake fresh rolls for breakfast - remove from the refrigerator and allow 30 minutes at room temperature before baking).
Bake: Bake at 180°C (fan) for 22–25 minutes until golden. The internal temperature should reach 88-90°C.
Allow to cool in the tin for 10 minutes. Beat the cream cheese glaze ingredients together until smooth and pourable. Pour over the warm rolls while they are still in the tin - the glaze soaks into the gaps between rolls and produces the characteristic sticky, cream-cheese-drenched result.
Serve immediately. Cinnamon rolls are at their absolute peak warm from the oven with the glaze just applied. The second-best moment is 30 minutes later. They decline from there.
The Overnight Method for Weekday Baking
The overnight cold prove is the specific technique that makes enriched dough practical for weekday mornings:
Saturday afternoon: Make the dough and complete the first prove. Shape the brioche or cinnamon rolls. Place in the tin. Refrigerate overnight.
Sunday morning: Remove from the refrigerator 30 minutes before baking. Bake. Glaze. Eat warm.
The cold retard (refrigerator overnight) develops flavour through slow fermentation and makes the dough significantly easier to handle during shaping (cold enriched dough is firm; room-temperature enriched dough is soft and difficult). The flavour of overnight cold-proved cinnamon rolls is noticeably more complex than same-day rolls.
Further Enriched Dough Applications
Burger buns: Reduce the sugar to 20g. Add 1 tbsp of sesame seeds to the egg wash. Prove and bake at 200°C for 15 minutes.
Chelsea buns: Roll the dough as for cinnamon rolls, but fill with currants, mixed peel, and cinnamon. Shape into a tight spiral and bake in a round tin. Glaze with warm apricot jam immediately from the oven.
Doughnuts: Shape the proved dough into rounds. Deep-fry at 175°C for 2-3 minutes per side until golden. Drain, cool briefly, and roll in caster sugar. Fill with jam, custard, or cream using a piping bag with a thin tip.
Pro Tips
- The butter must be soft, not melted. Melted butter behaves differently from soft butter during incorporation - it does not produce the same emulsification in the dough and results in a greasy, poorly structured product. Leave butter at room temperature for 2 hours minimum.
- Be patient during butter incorporation. The dough looks terrible in the middle of the process. Every experienced baker knows this and waits. The transformation happens - usually in the 8-12 minutes after the last butter addition - and the dough suddenly becomes smooth, glossy, and elastic. Trust the process.
- A stand mixer is strongly recommended. The enriched dough technique is achievable by hand, but the extended mixing required for butter incorporation is extremely demanding. If you make enriched dough regularly, a stand mixer pays for itself in effort saved.
- The windowpane test twice. Perform it after the lean dough stage (before butter) and again after full butter incorporation. The dough should pass both times.
The Most Common Enriched Dough Failure: Adding Butter Before Gluten is Developed Butter added to insufficiently developed dough coats the flour particles and prevents further gluten formation - the dough never builds adequate structure. The result is a soft, greasy, flat bread with a tight crumb. Develop the gluten completely first (windowpane test), then add the butter in small increments. The order is not negotiable.
FAQ
Q: Can I make brioche without a stand mixer?
Yes - but expect a more demanding process. Use the slap-and-fold kneading technique (slap the dough against the work surface, fold, rotate, repeat) for the lean dough stage, then incorporate the butter by pressing and folding. It takes approximately 20-25 minutes of active work. The result is the same; the effort is greater.
Q: My cinnamon rolls unravel during baking. How do I prevent this?
Roll the dough tightly during shaping and seal the border edge firmly. Also ensure the filling doesn't extend all the way to the short edges - leave a 2cm border on both short ends. Excess filling at the edges creates a slippery surface that prevents the roll from sealing.
Q: Can I freeze cinnamon rolls?
After shaping, freeze the unbaked rolls on a baking sheet. Once solid, transfer to a sealed bag. The night before baking, transfer to the fridge to thaw. The next morning, allow 1 hour at room temperature before baking. Bake and glaze as normal.
🔗 Continue Baking
Latest