Sourdough Bread: The Beginner's Definitive Guide
The 48-hour process demystified completely - what is happening at each stage, and exactly what to do about it
Sourdough bread is not technically difficult. The steps are clear; the ingredients are three (flour, water, salt); the process is mostly the dough doing its own work while you do other things. What makes sourdough seem intimidating is not the difficulty - it is the vocabulary, the timings, and the absence of a clear explanation of why each step exists.
This guide provides that explanation. Every stage in the sourdough process - the leaven, the autolyse, the stretch-and-fold, the bulk fermentation, the pre-shape, the cold retard, the scoring, the Dutch oven bake - is explained in terms of what is happening in the dough and why it matters. By the end of this post, you will understand sourdough bread well enough to adapt the schedule to your own life, diagnose problems when they arise, and improve with every loaf.
You will need an active sourdough starter. If you don't have one, the Fermentation collection's sourdough starter guide walks through the complete process of building one from flour and water. Allow 5-7 days for the starter to become reliably active before using it for bread.
Understanding the Timeline
Sourdough bread takes 24-48 hours from start to finish. Most of this time is the dough fermenting in the refrigerator or at room temperature - your active involvement is perhaps 45 minutes spread across two days. Here is the full schedule:
Day 1, evening (~15 minutes active):
- 8pm: Build the leaven
- 9pm (or before bed): Check the leaven is active
Day 2, morning (~20 minutes active over several hours):
- 8am: Autolyse (mixing flour and water)
- 8:30am: Add leaven and salt; slap-and-fold technique
- 9am-1pm: Bulk fermentation with stretch-and-fold sets every 30-45 minutes (4-5 sets)
- 1pm: Pre-shape
- 1:30pm: Final shape and transfer to banneton
- 2pm: Cold retard begins (refrigerator, overnight)
Day 3, morning (~5 minutes active + 45 minutes baking):
- Whenever ready: Score and bake directly from the refrigerator
This schedule is designed around a working week - the bulk fermentation happens over a morning at home, the cold retard happens overnight while you sleep, and the bake happens whenever the morning allows. Adjust the timings by ±2 hours based on kitchen temperature.
Ingredients
Makes 1 × 900g loaf | Active time: 45 minutes over 2 days
- 450g strong white bread flour (12-14% protein) - the high protein content is what develops sufficient gluten for sourdough's structure
- 325ml room-temperature water (72% hydration - correct for a beginner loaf; experienced bakers increase to 75-80%)
- 90g active sourdough starter (fed and at peak activity - see below)
- 9g fine sea salt (2% baker's percentage)
Equipment:
- Large bowl for mixing and bulk fermentation
- Banneton (proofing basket) - or a bowl lined with a floured tea towel
- Dutch oven (enamelled cast iron) - the single most important piece of equipment for a good home sourdough crust
- Bench scraper
- Lame (bread scoring tool) or a very sharp knife or razor blade
- Instant-read thermometer (for internal temperature)
The Leaven: Building the Fermentation Force
The leaven (also called levain) is a small quantity of ripe starter mixed with fresh flour and water and left to ferment until active, bubbly, and at its peak. It is built separately from the main dough because it allows you to use a predictable, measured amount of fermentation activity in the bread - rather than adding starter directly, which varies in activity depending on when it was last fed.
Building the leaven (Day 1, evening): Combine 20g of your active sourdough starter with 80g of strong white bread flour and 80g of room-temperature water. Mix until no dry flour remains. Cover and leave at room temperature for 8-12 hours.
The float test: Drop a small spoonful of leaven into a glass of water. If it floats, it is ready - the gas bubbles produced during fermentation are present in sufficient quantity to make it buoyant. If it sinks, it needs more time.
The bubble test: The leaven should be clearly bubbly and domed at the top, with a network of bubbles visible through the sides of the container if using glass.
Temperature and timing: At 20-22°C (typical kitchen temperature), the leaven is ready in approximately 10-12 hours. At warmer temperatures (25°C+), it may be ready in 6-8 hours. At cooler temperatures (18°C), it may need 12-14 hours. The float test is more reliable than timing.
The Autolyse: Hydrating the Flour
The autolyse is a rest period after mixing flour and water, before any other ingredients are added. During this rest, the flour fully hydrates and the gluten begins to develop without any mechanical work.
Method: In a large bowl, combine the bread flour with 300ml of the water (reserve 25ml for dissolving the salt). Mix with your hands until no dry flour remains and the mixture comes together into a rough, shaggy dough. There should be no dry flour at the bottom of the bowl.
Cover and rest for 30-60 minutes.
What is happening: The water is penetrating the flour particles and activating the glutenin and gliadin proteins. These proteins are beginning to form gluten bonds. When you return after the autolyse, the dough will be noticeably smoother and more cohesive than when you left it - without any kneading. The autolyse reduces the amount of mechanical work (kneading or folding) needed to develop the gluten fully.
Adding the Leaven and Salt
After the autolyse, add the leaven and salt.
Pour the leaven over the autolysed dough. Dissolve the salt in the reserved 25ml of water and add to the bowl.
Use the slap-and-fold technique (also called French folding) to incorporate everything:
- Grab the dough with both hands
- Lift it and slap it down onto the work surface
- Fold the far end back over itself toward you
- Rotate 90° and repeat
Continue for 5-8 minutes until the dough is smooth, elastic, and passes the windowpane test: stretch a small piece of dough between your fingers; it should be thin enough to see light through without tearing. This indicates sufficient gluten development.
Transfer the dough back to the bowl, cover, and proceed to bulk fermentation.
Bulk Fermentation and Stretch-and-Fold
Bulk fermentation is the primary fermentation stage - the period during which the yeast and bacteria in the leaven consume the flour's sugars and produce carbon dioxide (which inflates the dough) and organic acids (which develop flavour). At 21°C, bulk fermentation takes approximately 4-5 hours.
Stretch-and-fold sets: During the first 2-3 hours of bulk fermentation, perform 4-5 sets of stretch-and-fold, spaced 30-45 minutes apart.
Method: With the dough in the bowl, reach under one side of the dough, stretch it upward as far as it will go without tearing, and fold it over the top. Rotate the bowl 90° and repeat - four folds total complete one set.
What stretch-and-fold does: Traditional kneading develops gluten by continuously working the dough. Stretch-and-fold achieves the same result more gently - by stretching the dough, you align and strengthen the gluten network incrementally. After each set, the dough becomes progressively more elastic, more cohesive, and more able to hold the gas produced by fermentation.
Signs that bulk fermentation is complete:
- The dough has increased in volume by approximately 50-75% (not doubled; sourdough doesn't need to double)
- The surface is domed and slightly bubbly
- The edges of the dough are domed rather than flat (indicating gas development throughout)
- The dough jiggles like jelly when the bowl is gently shaken
- A poke test: press a floured finger into the dough surface. The indent should spring back slowly but not immediately (immediate spring = underfermented; no spring = overfermented)
Temperature is the primary variable: At 24°C, bulk fermentation may complete in 3.5 hours. At 18°C, it may take 6-7 hours. Rely on the visual and tactile signs above rather than time.
Pre-Shape and Bench Rest
Turn the dough gently onto an unfloured surface (the slight stickiness provides friction). Using a bench scraper, fold the dough toward you in a continuous dragging motion, building surface tension. Work around the dough 4-5 times until a tight ball forms with a smooth, taut surface.
Leave the pre-shaped round on the bench, uncovered, for 20-30 minutes. This bench rest allows the gluten to relax after the shaping, making the final shape easier to execute and preventing tearing.
Final Shape
The final shape builds the maximum surface tension, which is what holds the loaf's form during the cold retard and bake.
For a batard (oval) shape:
- Gently flatten the pre-shaped round into a rough rectangle
- Fold the top third down and the bottom third up (like a letter)
- Roll tightly toward you, sealing the seam with each roll
- Transfer seam-side up into a heavily floured banneton
For a boule (round) shape:
- Gently flatten the pre-shaped round
- Fold all four sides to the centre
- Flip seam-side down
- Drag the bench scraper toward you to build surface tension in a circular motion
- Transfer seam-side up into a heavily floured banneton
Flouring the banneton: Use a 50/50 mix of rice flour and plain flour. Rice flour does not absorb water and prevents sticking far more effectively than plain flour alone.
Cold Retard (Overnight in the Refrigerator)
Cover the banneton with a shower cap or cling film and refrigerate for 8-16 hours. This cold retard serves several purposes:
Flavour development: The cold slows yeast activity dramatically but does not stop bacterial activity - the organic acids (lactic and acetic) continue to develop during the cold retard, producing the characteristic sourdough tang. A longer cold retard produces more pronounced sour flavour.
Structural development: The cold firms the dough, making it easier to score. A cold loaf holds its shape better during scoring and in the early minutes of baking, before the crust sets.
Flexibility: The cold retard means you can bake whenever your morning allows - the loaf can stay in the refrigerator for up to 18 hours without over-fermentation.
Scoring and Baking
Preheat the oven and Dutch oven: Preheat to 250°C (or as high as your oven will go) with the Dutch oven (lid on) inside. Allow at least 45 minutes of preheating - the Dutch oven needs to be fully heated. A cold Dutch oven produces a flat, pale crust.
Score the loaf: Remove the banneton from the refrigerator. Place a piece of parchment paper over the banneton and invert - the loaf falls onto the parchment, seam-side down. Work quickly; the cold loaf softens quickly at room temperature.
Using a lame, razor blade, or very sharp serrated knife, score the top of the loaf with a single decisive slash at a 30-45° angle, approximately 1cm deep. This score controls where the loaf opens during baking - without a score, the loaf will burst randomly at its weakest point.
Baking:
Covered (first 20 minutes): Lower the scored loaf (on its parchment) into the hot Dutch oven. Replace the lid. The lid traps the steam released by the bread in the first minutes of baking. This steam is what produces the glossy, crispy crust - it keeps the surface pliable during oven spring (the final rise that happens in the first 15 minutes of baking), allowing maximum volume before the crust sets.
Uncovered (final 25 minutes): Remove the lid. The surface will already be golden. Continue baking at 230°C (reduce from 250°C) for 20-25 minutes until deeply golden-brown, almost dark. An internal temperature of 95-97°C confirms the loaf is baked through.
Don't be afraid of colour. Sourdough should be dark - a deep, mahogany brown rather than pale gold. The darker crust contains more Maillard flavour compounds and produces the specific taste of a good sourdough crust.
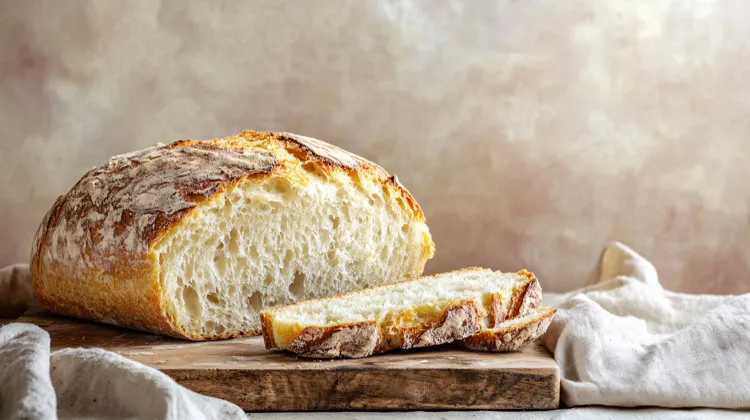
Cooling: The Final Step That Most People Rush
Place the loaf on a wire rack and allow it to cool completely - a minimum of 2 hours, ideally longer. The interior is still baking via carryover heat during this period, and the steam inside the loaf is escaping and redistributing. Cutting into a hot loaf produces a gummy, dense interior that does not reflect the bread's actual quality. Cutting into a fully cooled loaf reveals the open, airy crumb that the 48-hour process produces.
Reading the Crumb
The cross-section of a cut sourdough loaf tells you what happened during fermentation:
Large, irregular holes throughout: Excellent fermentation, well-developed gluten structure, correct hydration. The ideal result.
Dense, uniform crumb with small holes: Under-fermented (bulk fermentation ended too early), or the gluten wasn't sufficiently developed, or the shaping was too tight.
Gummy interior, large holes at the top: Over-fermented - the gluten structure weakened and the gas escaped unevenly. Or sliced before fully cooled.
Pale, thick crust: The Dutch oven wasn't hot enough, or the loaf was under-baked. Dark crust = more flavour.
Troubleshooting
The bread didn't rise at all: The starter or leaven wasn't active enough. Perform the float test before using the leaven - if it doesn't float, it needs more time. Also check that the starter is being fed regularly with the correct flour.
The bread is very sour: The cold retard was too long, or the bulk fermentation was at high temperature (warm = more acetic acid = more sour). Reduce cold retard to 8 hours and bulk ferment at a cooler temperature.
The bread is not sour enough: The cold retard was too short, or the starter was very young. Extend the cold retard to 16 hours.
The crust is pale and chewy: The Dutch oven wasn't hot enough, or the lid was removed too early. Ensure 45 minutes of preheating and don't remove the lid before 20 minutes.
The loaf spread flat rather than rising: The gluten was underdeveloped (more stretch-and-fold sets needed), the bulk fermentation was too warm (over-fermented and the gluten structure weakened), or the shaping didn't build sufficient surface tension.
Pro Tips
- Weigh everything. Sourdough hydration is calculated precisely - a few extra grams of water in a 72% hydration dough shifts it toward a dough that is harder to handle. Use scales for everything, including water.
- Temperature is the key variable. If your kitchen is cold, bulk fermentation takes longer; if it is warm, it finishes faster. Learn your kitchen's temperature patterns. A dough thermometer costs £5 and removes the guesswork from timing.
- The first loaf is rarely the best. Sourdough rewards practice more than almost any other bread - the baker who has made 20 loaves makes better bread than the baker who has made 5, because they know what their starter behaves like, what their kitchen temperature does to fermentation, and how to read the signs. Start, keep a simple log, and improve.
- Connect to the fermentation collection. The Sourdough Starter Guide in the Fermentation collection covers everything about building and maintaining your starter. The Fermentation Science post explains the microbiology that makes sourdough's flavour possible.
Common Mistake: Opening the Dutch Oven Too Early The steam trapped in the covered Dutch oven during the first 20 minutes of baking is not optional. It keeps the bread's surface pliable during oven spring, allowing the bread to rise to its full volume before the crust sets. Removing the lid early - even at 15 minutes - sets the crust before the loaf has expanded fully, producing a denser loaf with a thick, hard crust and less open crumb. Wait the full 20 minutes. The bread is doing its best work while the lid is on.
FAQ
Q: Can I make sourdough without a Dutch oven?
A Dutch oven replicates the steam injection of a professional deck oven. Without one, acceptable bread is possible by placing a baking stone or heavy sheet pan in the oven and adding a tray of boiling water to the bottom of the oven for the first 20 minutes. The results are noticeably inferior - less oven spring, paler crust, less open crumb. A Dutch oven (£30-80) is the single most impactful equipment purchase for home bread baking.
Q: My starter has liquid on top. Is it ruined?
The liquid (called "hooch") is alcohol produced by the yeast - a sign that the starter is hungry and needs feeding. Pour off the liquid, discard half the starter, and feed with fresh flour and water. The starter is not ruined. It simply needs feeding more frequently.
Q: How do I know when my starter is ready to use?
The float test (described above) is the most reliable indicator. The starter should also double in volume within 4-8 hours of being fed, smell pleasantly sour and yeasty (not like nail polish remover or rotting food), and have a domed top at peak activity. See the Sourdough Starter guide for the complete starter assessment guide.
🔗 Continue Baking
- Sourdough Starter: The Complete Guide to Building and Maintaining Yours - Fermentation collection
- Focaccia: The Forgiving Bread That Always Works
- The Science of Gluten: Why Bread Has Structure and Cake Doesn't
- The Science of Leavening: Yeast, Baking Soda, Baking Powder, Steam
- Banana Bread: The Science Behind a Perfect Loaf
- Baking From Scratch: The Complete Guide
Latest