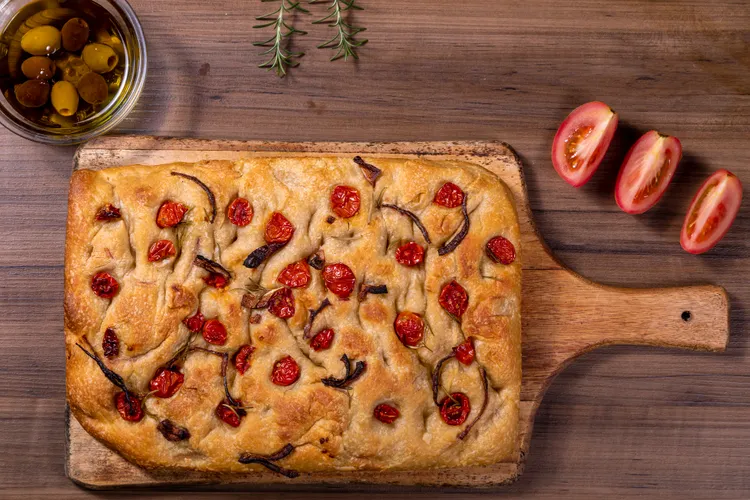
Focaccia: The Forgiving Bread That Teaches You Everything
High hydration, no shaping anxiety, extraordinary results - the ideal first yeasted bread, and a great one at any level
If you have never made a yeasted bread before, make focaccia first. Not because it is simple - it is not simple, exactly, but it is forgiving, which is a more valuable quality in a beginner bread. Focaccia tolerates a wide range of timings, temperatures, and technique variations and produces excellent results across all of them. A sourdough loaf made incorrectly produces a flat, dense disappointment. Focaccia made incorrectly produces a slightly less airy version of a great thing.
More importantly, focaccia teaches. It teaches you what an active yeast dough looks like after proving - bubbly, pillowy, clearly alive. It teaches you how a high-hydration dough (this one is 80% hydration - very wet by most bread standards) behaves differently from a stiff dough. It teaches you what "olive oil environment" means in bread baking and why it produces the characteristic golden, crispy base and soft, pillowy interior that nothing else achieves. And the dimpling - pressing your fingers into the proved dough until they nearly touch the base of the pan - is the most satisfying single action in bread baking.
This is the recipe. An overnight cold prove for the best flavour. The simplest possible topping (rosemary and flaky salt) and four variations. And the explanation of why each step matters.
Why Focaccia Is Structurally Different from Other Breads
Most breads are shaped: the dough is worked into a specific form (a round boule, an oval batard, a sandwich loaf) that determines the final shape of the bread. The shaping process builds surface tension that holds the loaf together during baking.
Focaccia is not shaped. It is stretched - gently pulled and dimpled into the tin it will bake in, supported by the tin's walls rather than by its own gluten structure. This is why focaccia is so forgiving: there is no shaping anxiety, no worrying whether the surface tension is right, no checking whether the seam is properly sealed. You stretch the dough into the tin, let it fill the corners naturally over an hour, dimple it with your fingers, top it with olive oil and aromatics, and bake it.
The other structural difference is the olive oil. Focaccia is baked in a well-oiled pan - significantly more oil than other breads - and oil is drizzled generously over the surface before baking. The base cooks in the pooled olive oil, producing the characteristic crispy, golden, slightly fried underside that is one of focaccia's most distinctive pleasures. The surface olive oil produces the golden, craggy top.
Ingredients
Makes 1 large focaccia (30×40cm tin or two smaller tins) | Active time: 20 minutes | Total time: 18-24 hours (mostly hands-off)
The Dough
- 500g strong white bread flour - the high protein content develops sufficient gluten to hold the high-hydration dough's structure
- 400ml lukewarm water (80% hydration - noticeably wetter than most bread doughs)
- 7g instant dried yeast (1 sachet) - or 14g fresh yeast
- 10g fine sea salt
- 2 tsp caster sugar - feeds the yeast in the initial mixing stage
- 4 tbsp good olive oil - for the dough itself
The Pan and Topping
- 5-6 tbsp good olive oil - for the pan (generous - this is not a drizzle, it is a pool)
- 2 tbsp additional olive oil - for the surface before baking
- 2-3 sprigs fresh rosemary, leaves stripped
- 1-1.5 tsp flaky sea salt (Maldon or similar) - scattered just before baking
Method
Step 1: Mix and first prove (10 minutes active + 1 hour passive)
In a large bowl, combine the flour, instant yeast, sugar, and salt. Make a well in the centre. Add the lukewarm water and olive oil. Mix with a fork or dough whisk until everything comes together - the dough will be very wet and sticky. This is correct. Resist the instinct to add more flour.
Transfer to a lightly oiled large bowl. Cover with a damp cloth or cling film. Leave at room temperature for 1 hour until roughly doubled.
Alternatively - and better - the overnight cold prove (recommended): After mixing, cover the bowl tightly and refrigerate immediately, without the room-temperature prove. Leave in the refrigerator for 8-18 hours. The cold, slow fermentation develops significantly more flavour - the organic acids produced by yeast fermentation over a long, cold period produce a more complex, slightly tangy dough than a quick room-temperature prove. Remove from the refrigerator 1 hour before the next step to allow it to return to room temperature.
Step 2: Oil the pan and stretch the dough
Pour 4-5 tbsp of olive oil into a large baking tin (30×40cm). Tilt to coat the base and sides generously. The oil should pool - not just coat.
Transfer the proved dough to the oiled tin. Using your hands (oiled, not floured - oil prevents sticking without affecting the dough's texture), gently stretch the dough toward the corners. It will resist stretching and spring back - this is the gluten contracting. Do not force it.
The two-stage stretch: Stretch the dough as far as it will comfortably go. Leave it for 10 minutes. Return and stretch further - the gluten will have relaxed and the dough will be more cooperative. After two stages of stretching with a rest in between, the dough should fill or nearly fill the tin.
Step 3: Second prove in the tin (1 hour)
Cover the tin loosely and leave at room temperature for 45-60 minutes until the dough is visibly puffy, bubbly, and jiggles when the tin is gently shaken.
The visual indicators: The dough surface should look alive - small bubbles visible just below the surface, a slight dome, a noticeably increased thickness compared to when it went in.
Step 4: Dimple and top (5 minutes)
Preheat the oven to 220°C (fan) while the second prove is completing.
Drizzle the additional 2 tbsp of olive oil over the proved dough surface. Using all ten fingers, press firmly down into the dough until your fingers nearly touch the base of the tin. Work methodically across the whole surface, creating deep, irregular dimples everywhere.
The dimples do several things simultaneously: they puncture any large gas bubbles that would otherwise produce an uneven surface; they create the characteristic visual texture of focaccia; they trap olive oil in pockets that crisp and brown during baking; and they produce the textural contrast between the airy interior and the crispy, oily surface.
Scatter the rosemary leaves into the dimples and over the surface. Scatter the flaky salt generously.
Step 5: Bake (22-25 minutes)
Bake for 22-25 minutes until the surface is deep golden-brown - not pale gold, but a rich, amber colour - and the edges are pulling away from the sides of the tin.
The base check: At 20 minutes, lift one corner of the focaccia with a spatula and check the base. It should be golden and crispy. If it's pale, the pan needed more oil or the oven temperature was too low.
Remove from the tin immediately (leaving it in the tin allows the base to continue cooking in the residual oil and can make it soggy). Transfer to a wire rack for at least 15 minutes before cutting.
Five Topping Variations
The rosemary-and-salt focaccia is the classic - but focaccia is one of the most adaptable baking platforms available. All toppings are added to the dimpled dough immediately before baking.
Tomato and Olive
Halve 200g of cherry tomatoes and press cut-side up into the dimples. Scatter 80g of black olives (pitted, halved). Add fresh thyme leaves and a generous drizzle of olive oil. The tomatoes burst during baking and their juice, mixed with the olive oil, creates small pools of flavour on the surface.
Caramelised Onion and Brie
Slowly caramelise 3 large onions (thinly sliced, cooked in olive oil over low heat for 40 minutes until deeply golden and jammy). Spread over the dimpled dough. Add 100g of thinly sliced brie. Scatter fresh thyme. The brie melts into the onion during baking, producing a surface that is almost savoury and sweet simultaneously.
Potato and Rosemary (White Focaccia)
Thinly slice 2 small waxy potatoes (use a mandoline - 2mm). Toss with olive oil, salt, and pepper. Arrange overlapping on the dimpled dough. Scatter rosemary and flaky salt. The potato slices crisp at the edges where they extend beyond the dough and become tender in the centre - a combination that is different from anything in most bread repertoires.
Overnight Focaccia with Roasted Garlic
Roast a whole head of garlic (wrapped in foil with olive oil, 45 minutes at 200°C until soft and caramelised). Squeeze the roasted cloves from their skins and dot across the dimpled dough. Add rosemary and flaky salt. Roasted garlic on focaccia is deeply, specifically sweet and savoury - one of the great bread-adjacent flavour combinations.
Lemon, Herb, and Sea Salt (Liguria Style)
Thinly slice half a lemon (2mm rounds). Press into the dimples. Scatter fresh thyme, a few torn sage leaves, and generous flaky salt. The lemon slices caramelise slightly during baking and produce a bright, slightly bitter note that is specifically good against the rich olive oil crumb.
Serving Focaccia
As bread: Torn into pieces for dipping in olive oil, served alongside soup (particularly good with the Butternut Squash and Coconut Soup from the Plant-Based collection), or as the bread component of a cheese board.
As a sandwich base: Sliced horizontally and filled. Focaccia's open crumb holds moisture without becoming soggy - it is an excellent sandwich bread.
As a pizza base: Dimpled, topped with tomato, cheese, and toppings, and baked as a thick-crust pizza. The olive-oil-enriched dough produces a more complex base than standard pizza dough.
Warm or room temperature: Focaccia is best eaten within a few hours of baking. Unlike sourdough, which improves for a day after baking, focaccia is at its peak warm from the oven and declines steadily after that. The base loses its crispness; the crumb becomes denser. Make it and eat it.
Make-Ahead Notes
The dough (before the second prove): The overnight cold prove is the recommended approach - make the dough the night before, refrigerate overnight, and bring out the morning you want to eat it. The flavour improvement is significant.
Baked focaccia: Best eaten the day it is made. Revive day-old focaccia by wrapping in foil and warming in a 160°C oven for 10 minutes - it doesn't recover the crispness of fresh, but it is considerably better than cold focaccia.
Freezing: Focaccia freezes adequately wrapped tightly in foil and a freezer bag. Reheat from frozen at 180°C for 15 minutes. Acceptable; not the same experience as fresh.
Pro Tips
- Use more oil than you think you need. The olive oil in and on the pan is not a light coating - it should visibly pool. Focaccia's characteristic base comes from cooking in olive oil, not from baking on a greased tin. This requires approximately twice the oil most bakers' instincts suggest.
- Don't add more flour to the sticky dough. A 80% hydration dough is noticeably wetter and stickier than most bread doughs. The stickiness is correct. Flour added to make it easier to handle reduces the hydration, producing a denser, less airy result. Wet hands and a bench scraper make handling a sticky dough manageable.
- Take the dimpling seriously. Half-hearted dimpling produces focaccia that is less characteristic and slightly more bread-like. Press firmly - all the way to the base of the tin. The dimples should be deep and clearly defined.
- Wait for the second prove. The second prove in the tin (after stretching) produces the final airiness. A focaccia baked before the second prove is adequately proved looks flat and dense. Forty-five minutes of patience produces the pillowy, bubbly surface that makes focaccia remarkable.
Common Mistake: Using Too Little Oil in the Pan Focaccia's base should be crispy and golden from cooking in olive oil - not just baked on a lightly greased surface. If your focaccia has a pale, soft, slightly gummy base, the pan didn't have enough oil. The oil in the tin should visibly coat the base and pool slightly in the corners. At 5-6 tbsp for a 30×40cm tin, it sounds like a lot. It is. That quantity is correct and is what produces the specific focaccia texture that makes it worth making.
FAQ
Q: Can I use active dry yeast instead of instant?
Yes - dissolve the active dry yeast in the lukewarm water with the sugar and leave for 5-10 minutes until foamy (this confirms it is alive and active). Then add to the flour with the oil and salt as normal. Instant yeast can be added directly to the dry ingredients without pre-activation.
Q: Why is my focaccia dense rather than airy?
Three possible causes: the yeast was not active (check the date on the packet and test with warm water and sugar), the dough was not proved long enough (both proves need to complete fully), or the water was too hot (above 38°C kills yeast). Use lukewarm water - it should feel warm on the wrist but not hot.
Q: Can I make focaccia without a large tin?
Yes - divide the dough between two 20×30cm tins, or use a 30cm round tin. The baking time remains approximately the same; a thicker focaccia (more dough in a smaller tin) will need 3-5 additional minutes. Check the base colour and the internal temperature (90°C+) rather than time.
🔗 Continue Baking
Latest