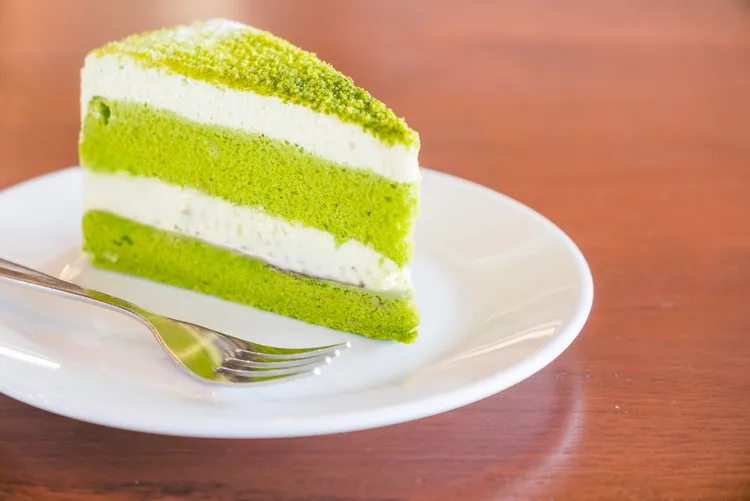
Matcha White Chocolate Cake
The pairing that changes everything - earthy, vivid, impossibly creamy
Some flavor combinations feel inevitable once you discover them. Matcha and white chocolate is one of those. The deep, slightly bitter earthiness of matcha against the sweet, milky richness of white chocolate creates a balance so natural, so complementary, that you'll wonder why you ever made a plain vanilla cake.
This is a showstopper. Two layers of tender, vivid green sponge, filled and frosted with a white chocolate cream cheese frosting that is - genuinely - one of the best things we've ever made in this kitchen. It looks extraordinary on a table. It tastes even better than it looks.
Matcha grade note: Always use culinary grade matcha for baking. Ceremonial grade is too delicate and expensive - its nuance disappears in the oven. Not sure which to buy? See Matcha 101: Why Not All Green Powders Are Created Equal and our Best Matcha Powders of 2025, Ranked.
What Makes This Cake Special
The color. Culinary grade matcha in a cake batter produces a genuinely vivid green - a color that holds through baking and looks dramatic against the white frosting. The key is using enough matcha (don't be shy) and not overbaking, which fades the green.
The frosting. Most matcha cakes use plain buttercream, which is fine but not remarkable. We use a white chocolate cream cheese frosting - the slight tang of cream cheese cuts through the sweetness of the white chocolate, and the whole thing becomes something much more complex and interesting.
The crumb. The addition of sour cream keeps the crumb remarkably moist and tender - important, because matcha cakes can dry out faster than plain sponge.
Ingredients
Makes one 8-inch two-layer cake (serves 10–12)
For the Cake
- 280g plain flour, sifted
- 20g culinary grade matcha (about 4 tsp) - see our buying guide
- 2 tsp baking powder
- ½ tsp baking soda
- ½ tsp fine sea salt
- 225g unsalted butter, softened to room temperature
- 300g caster sugar
- 3 large eggs, room temperature
- 2 tsp vanilla extract
- 240ml whole milk, room temperature
- 120g full-fat sour cream, room temperature
For the White Chocolate Cream Cheese Frosting
- 200g good quality white chocolate, finely chopped
- 450g full-fat cream cheese, room temperature
- 150g unsalted butter, softened
- 300g icing sugar, sifted
- 1 tsp vanilla extract
- Pinch of fine sea salt
To Finish (Optional but Recommended)
- White chocolate shavings or curls
- A light dusting of culinary grade matcha
- Fresh raspberries (the tartness is extraordinary against the sweetness)
Method
Make the Cake Layers
1. Prep Preheat oven to 175°C (350°F). Grease two 8-inch round cake tins and line the bases with baking parchment.
2. Mix dry ingredients In a medium bowl, whisk together flour, matcha, baking powder, baking soda, and salt. Make sure the matcha is evenly distributed - any pockets of unmixed matcha will create bitter spots.
3. Cream butter and sugar In a large bowl, beat softened butter and caster sugar together with an electric mixer on medium-high speed for 4-5 minutes, until the mixture is very pale, fluffy, and noticeably increased in volume. Don't rush this step - proper creaming is what gives the cake its lift.
4. Add eggs and vanilla Add eggs one at a time, beating well after each addition. Add vanilla and beat to combine. The mixture may look slightly curdled - that's fine.
5. Combine wet and dry Whisk together milk and sour cream in a jug. With the mixer on low, add the dry ingredients in three additions, alternating with the milk mixture (dry, wet, dry, wet, dry). Mix until just combined after each addition - overmixing develops gluten and makes the cake tough.
6. Bake Divide batter evenly between the prepared tins and smooth the tops. Bake for 28-32 minutes, until a skewer inserted in the centre comes out clean and the cakes spring back lightly when pressed. The colour should be a deep, muted green - vibrant green goes slightly darker in the oven, which is normal.
7. Cool Leave cakes in tins for 10 minutes, then turn out onto a wire rack to cool completely. Do not frost until completely cool - the frosting will melt if you rush.
Make the Frosting
1. Melt white chocolate Melt white chocolate in a heatproof bowl set over a pan of barely simmering water, stirring until smooth. Do not overheat - white chocolate seizes easily. Remove from heat and cool to room temperature (about 20 minutes).
2. Beat cream cheese and butter Beat cream cheese and softened butter together until completely smooth and lump-free, about 2 minutes.
3. Add chocolate and sugar Pour in the cooled melted white chocolate and beat to combine. Add sifted icing sugar, vanilla, and salt. Beat on medium speed until the frosting is smooth, light, and spreadable. If it seems too soft, refrigerate for 15 minutes.
Assemble
1. Place one cake layer on your serving plate or cake board.
2. Spread a generous layer of frosting over the top - about one-third of the total frosting.
3. Place the second layer on top, pressing gently to level.
4. Apply a thin crumb coat of frosting all over the cake and refrigerate for 20 minutes to set.
5. Apply the remaining frosting in sweeping strokes - use a palette knife or offset spatula. It doesn't need to be perfect; a slightly textured finish looks beautiful.
6. Decorate with white chocolate shavings, a dusting of matcha, and fresh raspberries if using.
Tips
- Room temperature ingredients are non-negotiable for a smooth batter and frosting. Take everything out of the fridge an hour before you start.
- Don't open the oven for the first 25 minutes - temperature drops cause sinking.
- Sift your matcha directly into the flour rather than adding it separately - this ensures even distribution.
- Taste the frosting before adding all the icing sugar. White chocolate varies enormously in sweetness between brands.
- This cake keeps beautifully refrigerated for 3 days - the flavors deepen overnight. Bring to room temperature before serving.
Common Mistake: Overbaking Matcha cakes dry out faster than standard sponge because matcha is slightly absorbent. Check at 28 minutes and pull it when the skewer comes out with just the faintest moist crumb - not wet, but not bone dry either.
Variations
- Matcha & raspberry layer cake: Spread a thin layer of raspberry jam between the layers alongside the frosting - the acidity cuts through beautifully
- Lemon matcha cake: Add 2 tsp lemon zest to the batter and 1 tbsp lemon juice to the frosting for a brighter, more citrus-forward profile
- Single layer: Halve all quantities and bake in one 8-inch tin for 30-35 minutes - perfect for a casual weeknight bake
Serving Suggestions
This cake is rich - a small slice goes a long way. Serve with:
- A pot of traditional whisked matcha to echo the flavors
- A matcha latte for a full matcha experience
- Black coffee or tea if you want contrast rather than harmony
🔗 You Might Also Love
- Brown Butter Matcha Cookies - our most popular recipe
- Matcha Mochi Brownies - chewy, dense, and dramatic
- Matcha Shortbread - four ingredients, pure matcha flavor
- Matcha and Sesame Cookies - a classic Japanese pairing
- 10 Best Matcha Baking Recipes - the full collection
- Matcha 101: Grades Explained - buy the right powder
- The Ultimate Matcha Guide
Latest