One-Pot Beef Stew: The Sunday Classic Made Easy
The sear. The mirepoix. The correct cut. The slow braise. Everything that makes a proper beef stew - from one pot.
Beef stew is not a quick dinner. It is a long one - two and a half hours from start to table, most of which is the oven doing the work while you do something else. The active cooking time is 25 minutes. The passive time is two hours of the most productive kind: the kind where your kitchen fills with the smell of braising beef and wine, and the anticipation of what is coming makes the waiting feel entirely worthwhile.
A great beef stew is one of the most deeply satisfying things a home cook can make. Not technically difficult. Not requiring specialist equipment. Just a Dutch oven, a good piece of chuck beef, some aromatics, some wine, and patience. And a clear understanding of what each step in the process is doing - because unlike quick one-pan cooking, where the technique happens fast and is difficult to correct, stew cookery happens slowly and gives you every opportunity to understand and adjust.
This is the post that teaches the braising technique. Every step explained. The correct cut identified. The sear and its purpose clarified. The mirepoix built properly. And a recipe that produces a stew with the depth and richness that Sunday cooking should have.
The Correct Cut: Why Chuck, Not Anything Lean
This is the most important decision in beef stew, and the one most often made incorrectly. The instinct is to use a lean cut - sirloin, topside, something that looks clean and premium at the butcher's counter. This instinct is wrong.
Lean cuts are wrong for braising. Lean beef has little connective tissue (collagen). During the long, moist heat of braising, connective tissue converts to gelatin, which is what produces the silky, rich sauce that makes a proper stew. Without connective tissue, the lean meat simply dries out during the long cook - producing chewy, desiccated pieces of beef in a thin, watery liquid.
Chuck (braising steak) is right. Chuck comes from the shoulder - a muscle that does significant work and therefore develops substantial connective tissue. It is not considered a premium cut. It is relatively inexpensive. And when braised low and slow for 1.5-2 hours, the collagen converts completely to gelatin, the meat becomes fork-tender, and the braising liquid becomes the glossy, unctuous sauce that defines a great stew.
The rule: Never use a lean cut for braising. Connective tissue is not something to avoid - it is the ingredient that produces the result you want.
Ingredients
Serves 4-6 | Active time: 25 minutes | Total time: 2.5 hours
The Beef
- 900g beef chuck (braising steak), cut into 4-5cm cubes
- 2 tsp fine sea salt and 1 tsp black pepper - for seasoning before searing
- 2 tbsp neutral oil or beef dripping - for searing
The Mirepoix
- 2 medium onions, roughly diced
- 3 medium carrots, cut into 3cm pieces
- 3 stalks celery, cut into 3cm pieces
- 4 cloves garlic, minced
The Liquid and Aromatics
- 2 tbsp tomato purée
- 300ml red wine - a full-bodied red (Merlot, Cabernet, Shiraz). Not expensive wine, but wine you would drink. Cooking wine produces flat, slightly metallic stew.
- 600ml good-quality beef stock - hot
- 2 bay leaves
- 4 sprigs fresh thyme (or 1 tsp dried)
- 1 sprig fresh rosemary
The Vegetables (added later)
- 400g baby potatoes (halved) or 3 medium potatoes (cubed)
- 200g chestnut mushrooms, halved
To Finish
- 2 tbsp plain flour - used for dredging the beef before searing, which also thickens the stew
- Fresh flat-leaf parsley, chopped
- Good crusty bread or mashed potato to serve
Equipment
A 4–5 litre enamelled cast iron Dutch oven with a tight-fitting lid. This is the correct vessel for braising - it retains heat evenly, goes from hob to oven without issue, and the lid creates a seal that keeps moisture in the pot throughout the long cook. A heavy-based casserole dish with a lid works as an alternative.
Method
Step 1: Season and dredge the beef (5 minutes)
Pat the beef cubes completely dry with paper towels. Season generously with salt and pepper on all sides. Dredge lightly in the flour - toss a few pieces at a time in the flour, then shake off the excess. A light, even coating is the goal; a thick coating produces pasty, gluey stew.
Why flour-dredge? Two reasons. First, the flour on the surface of the beef accelerates browning during the sear. Second, the flour dissolves into the braising liquid during cooking and acts as a thickener, producing a stew sauce with body rather than a thin broth.
Step 2: Sear the beef in batches - the most important step (12 minutes)
Heat the oil in the Dutch oven over high heat until shimmering and just beginning to smoke. This is the hottest the pan will be during the entire recipe - the sear requires genuine high heat.
Add the beef in a single layer - do not crowd the pan. Overcrowded beef steams rather than sears, producing grey, boiled-looking meat with no crust. Work in 3-4 batches if necessary, searing each batch for 2-3 minutes per side until deeply browned on all surfaces.
Remove each batch to a plate as it finishes. Do not clean the pan between batches - the fond accumulating on the base is concentrated flavour.
The fond: By the end of all the searing, the base of the Dutch oven will be covered in dark brown residue. This is not burnt fat - it is caramelised protein and sugar, the Maillard products from the beef surface. It is the most flavourful component of the entire stew, and it will be incorporated into the sauce in the deglazing step.
Step 3: Build the mirepoix (8 minutes)
Reduce the heat to medium. Add a little more oil if the pan seems dry. Add the onion, carrots, and celery. Cook, stirring occasionally, for 6-7 minutes until the onion is soft and beginning to colour.
Add the garlic and tomato purée. Stir and cook for 2 minutes - the tomato purée caramelises slightly against the hot pan, losing its raw acidic edge and developing a deeper, richer flavour.
Step 4: Deglaze with wine (3 minutes)
Pour in the red wine. It will sizzle immediately. Scrape the bottom of the pot vigorously with a wooden spoon - every dark bit of fond must be dissolved into the wine. This step releases the concentrated flavour compounds from the searing stage into the liquid that will become the sauce.
Let the wine reduce for 3 minutes until the sharp alcohol smell has cooked off and the liquid has reduced slightly.
Step 5: Add stock, herbs, and beef
Add the hot beef stock, bay leaves, thyme, and rosemary. Return the seared beef to the pot along with any accumulated juices from the resting plate. The liquid should just barely cover the beef - add a little more stock or water if needed.
Bring to a gentle simmer on the hob.
Step 6: Braise in the oven (1 hour 45 minutes)
Preheat the oven to 160°C (fan). Cover the Dutch oven with its lid and transfer to the oven.
Why the oven rather than the hob? The oven produces gentle, even heat from all sides simultaneously, which prevents the uneven hot spots of hob cooking. The result is more even braising - every piece of beef surrounded by the same temperature on all sides.
After 1 hour, add the potatoes, pressing them down into the liquid. Cover and return to the oven.
After 45 more minutes (1 hour 45 minutes total), add the mushrooms. Cover and return for the final 15 minutes.
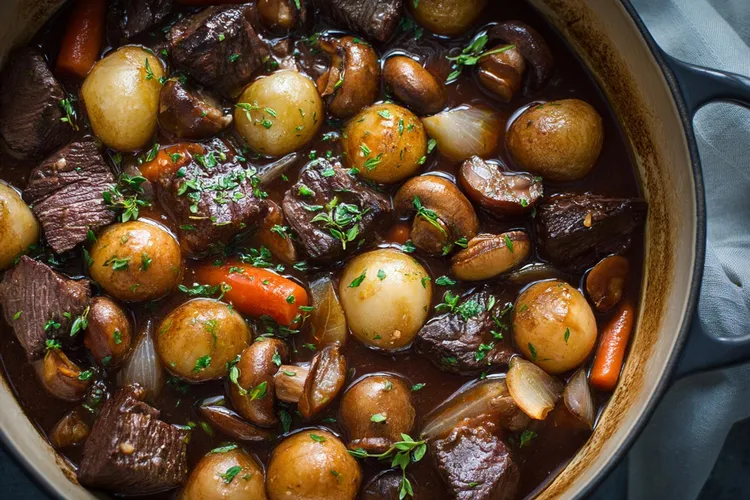
Total oven time: 2 hours. The beef is done when it yields easily to a fork with no resistance - it should fall apart slightly when pressed. The sauce should be rich, dark, and glossy.
Step 7: Adjust and finish
Remove the bay leaves, thyme, and rosemary sprigs. Taste the sauce - this is the most important tasting in the recipe. Adjust salt and pepper. If the sauce is too thin, remove the beef and vegetables with a slotted spoon and simmer the sauce on the hob for 5-10 minutes until it reaches the consistency you want, then return everything to the pot.
Scatter fresh parsley over the stew. Serve from the pot with crusty bread or mashed potato alongside.
The Three Signs of a Properly Made Stew
Before you serve, check:
The beef: Should offer almost no resistance when prodded with a fork. It should begin to break apart at the edges when pressed. If it is still firm, it needs more time - return to the oven for 20-30 minutes.
The sauce: Should coat the back of a spoon with a thin, glossy layer. Should taste deeply savoury and complex. If it tastes thin or watery, reduce it on the hob as described above. If it tastes flat or one-dimensional, it may need more salt - taste carefully and season incrementally.
The vegetables: Should be completely soft - potatoes that yield to a fork, carrots with no crunch. Vegetables added too late or cut too large will not be fully cooked. Return to the oven for 15 more minutes if needed.
Make-Ahead and Storage
Beef stew is one of the best make-ahead dinners in the collection. The flavour improves significantly over 24-48 hours as the collagen-rich sauce continues to develop.
Make 1-2 days ahead: Cool completely, refrigerate covered. The fat will solidify on the surface of the cold stew - skim this fat layer before reheating (it is significant and would make the reheated stew greasy).
Reheating: Gently on the hob over medium-low heat, stirring occasionally. Add a splash of stock or water if needed to loosen.
Freezing: Freezes excellently for up to 3 months. Freeze without bread accompaniments. Thaw in the refrigerator overnight before reheating.
Variations
With Guinness (Irish Style)
Replace the red wine with 440ml of Guinness or other stout. Reduce the stock to 400ml. Add 1 tbsp of Worcestershire sauce. The stout produces a darker, slightly more bitter sauce with a characteristic depth. Serve with colcannon or soda bread.
With Dijon and Tarragon (French Style)
Replace the rosemary with fresh tarragon. Add 2 tbsp of dijon mustard to the pot with the stock. In the final 10 minutes, stir in 100ml of crème fraîche. The result is a more refined, slightly creamy stew reminiscent of a French blanquette - less rustic than the standard version, more elegant.
Slow Cooker Version
Complete Steps 1-5 on the hob, then transfer everything to a slow cooker. Cook on low for 8-10 hours or high for 4-5 hours. Add potatoes and mushrooms in the final 2 hours on low or 1 hour on high. The slow cooker produces an even more tender result - the long, low cook breaks down the collagen almost completely.
Pressure Cooker / Instant Pot Version
Complete the searing and mirepoix on the sauté function. Add all ingredients including potatoes (cut smaller - 2cm cubes). Pressure cook on high for 35 minutes, then natural release for 15 minutes. Instant results at low and slow quality.
Pro Tips
- Sear in batches - always. This bears repeating because it is the step most skipped when people are in a hurry. Crowded beef does not brown; it steams. The 12 minutes of searing in batches is the single most impactful step for flavour in this recipe.
- Use wine you would drink. Wine labelled "cooking wine" is typically low-quality wine with added salt - it produces flat, slightly metallic sauces. Use a decent table wine. You don't need to use the whole bottle; drink the rest.
- The day-after stew is better. The gelatin from the collagen continues to develop in the refrigerator overnight, producing a richer, more unctuous sauce. If you can make this a day ahead, do so.
- Season only at the end. The braising liquid reduces during cooking, concentrating any salt added early. Season lightly during cooking and taste and adjust at the end - this prevents over-salting as the sauce reduces.
Common Mistake: Using the Wrong Cut The single most common beef stew failure is using a lean cut - topside, sirloin, or stewing steak labelled "premium." These cuts have insufficient connective tissue for braising and produce tough, dry beef in thin sauce. Always use chuck (braising steak, shoulder steak). At the butcher's, ask specifically for braising beef or chuck. The less premium it looks, the more likely it is to produce the unctuous, fork-tender result you want.
FAQ
Q: Can I make this gluten-free?
Yes - replace the plain flour dredge with fine cornflour (cornstarch), or skip the flour entirely and thicken the sauce by removing the beef at the end and reducing the sauce on the hob. Alternatively, a cornflour slurry (1 tbsp cornflour mixed with 2 tbsp cold water) stirred into the finished stew produces excellent thickening.
Q: My stew is too thin. How do I fix it?
Remove the beef and vegetables with a slotted spoon and set aside. Simmer the sauce on the hob over medium heat for 10-15 minutes, stirring occasionally, until it reduces to the consistency you want. Return everything to the pot to warm through. The sauce should coat the back of a spoon.
Q: How long can I braise for? Can I go longer than 2 hours?
2 hours at 160°C fan is the standard for chuck cut into 4-5cm cubes. Longer braising (up to 3 hours) produces even more tender beef. Beyond 3 hours, the beef can begin to dry out as the collagen fully converts and the muscle fibres begin to dehydrate. For longer braising, reduce the temperature to 150°C and ensure the liquid level remains adequate.
Q: Can I add red wine at the end instead of the beginning?
No - raw wine added at the end produces harsh, uncooked wine flavour. The wine must be added early and cooked down so its alcohol evaporates and its tannins and fruit compounds integrate into the sauce. The 3-minute reduction after adding the wine is the minimum; the subsequent 2-hour braise integrates it further.
🔗 Continue Cooking
Latest