Japanese Takoyaki: Osaka's Favourite Street Food at Home
The octopus balls of Dotonbori - the most joyful cooking experience in this collection
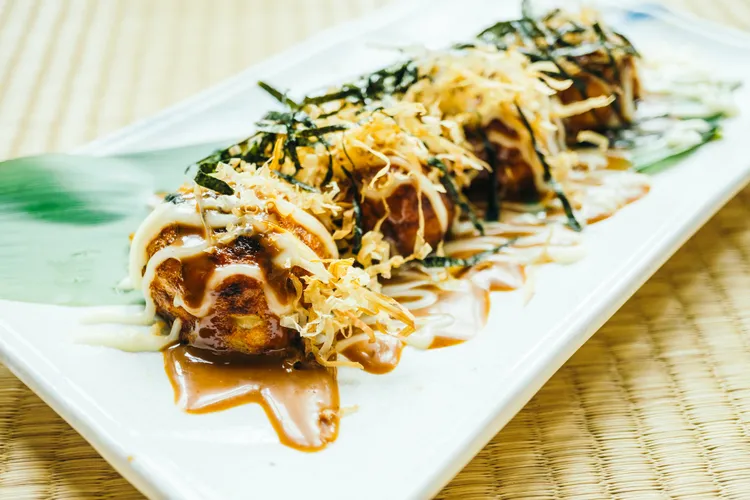
There is a street in Osaka called Dotonbori that is, by some measures, the most concentrated street food experience in the world. Neon signs reflecting off the canal. The smell of dashi and fat and caramelising sauce rising from dozens of stalls. And everywhere - from every direction, it seems - the specific sizzling sound of takoyaki batter being poured into hemispherical cast iron moulds, filling each cavity to the brim, and then the practiced hand of a vendor using metal picks to turn each ball with a single, confident rotation while the batter is still half-liquid, producing a sphere that is golden and crispy on the outside and molten, almost liquid, on the inside.
Takoyaki - literally "octopus cooking" - are the food of Osaka. Not a dish that happens to come from Osaka; a dish that is so identified with the city that asking an Osaka resident about their takoyaki is like asking a Neapolitan about their pizza. It is a matter of identity, of pride, and of very strong opinions about the correct ratio of dashi to egg in the batter.
The dish is made at home more in Japan than almost any other street food - dedicated takoyaki pans are a standard piece of kitchen equipment in Osaka households, used weekly, handed down. The cooking experience is communal and joyful: everyone gathers around the pan, picks and turns, debates readiness, reaches in before they've cooled sufficiently. That experience is what this guide is designed to recreate.
📖 Equipment note: Takoyaki requires a takoyaki pan - a cast iron or non-stick pan with hemispherical moulds (typically 7-8 per row, 12-16 total). This is the one genuinely specialist piece of equipment in this entire pillar. It is inexpensive (£15-30, available on Amazon and in Asian kitchen stores) and produces a result that no other pan can match. See the equipment section below for the best alternatives if you don't yet have one.
The History: From Akashiyaki to Dotonbori
Takoyaki was invented in Osaka in 1935, by a street food vendor named Tomekichi Endo who was inspired by akashiyaki - a similar spherical dumpling from the nearby city of Akashi, made from egg-heavy batter with octopus and served in dashi broth rather than with sauce.
Endo's innovation was the sauce - applying the sweet-savory okonomiyaki sauce (or a predecessor of it) and Japanese mayo to the exterior of the balls, then finishing with bonito flakes and aonori. This combination transformed the dish from a delicate, dashi-forward preparation into something bolder, more visually dramatic, and more suited to the street food context. By the 1950s takoyaki stalls were everywhere in Osaka; by the 1980s they had spread nationally.
The Osaka claim on takoyaki is so strong that the city is sometimes called the "takoyaki capital of the world" (たこやきの本場) - a designation that produces no argument from the rest of Japan. The specific texture standard that Osaka expects - molten, almost liquid interior; thin, crispy exterior; never fully cooked through - is the standard this recipe targets.
Understanding the Dish: The Texture Paradox
The most important and most counterintuitive thing about takoyaki is its texture: the interior should not be fully cooked.
A properly made Osaka-style takoyaki has a shell - thin, golden, just barely crispy - and an interior that is molten, almost flowing, with a consistency somewhere between a very soft scrambled egg and a thick batter. The octopus piece in the centre is warm and tender, surrounded by this liquid-ish batter, enclosed in a crispy sphere that holds everything together just long enough to be picked up, dressed, and eaten.
This texture horrifies people who have been taught that batter must be cooked through. It is not raw - the egg proteins have set enough to be food-safe and to hold the shape. But it is deliberately, intentionally underdone in the centre, because the fully cooked version - firm all the way through - is a different and lesser dish. The molten centre is the point.
The temperature key: The pan must be hot enough to set the exterior rapidly and thoroughly before the interior has time to fully cook. Too low a heat produces a ball that cooks evenly throughout - fully cooked, correct food safety, wrong texture. Maximum heat for the first 2 minutes, then slightly reduced for the turn and final set.
Equipment
The Takoyaki Pan
A takoyaki pan has 12-16 hemispherical cavities, each approximately 4cm in diameter. Cast iron versions retain heat better and produce the most even, crispy exterior. Non-stick versions are easier to release the balls from and are better for beginners.
What to buy: A cast iron takoyaki pan on Amazon (search "takoyaki pan cast iron") costs £20-30 and lasts indefinitely. Season it before first use: coat with a thin film of oil, heat over medium heat for 10 minutes, cool, wipe. A seasoned cast iron takoyaki pan is essentially non-stick and produces the best results.
Electric takoyaki makers: Available for £25-40, these are thermostatically controlled and produce very consistent results. Particularly good for beginners because the temperature is managed automatically.
The Turning Tools
Professional takoyaki vendors use two thin metal picks (kushi) to turn the balls - one to hold the half-formed ball in place while the other rotates the raw batter over the top, inverting the ball in a single fluid motion.
At home: two thin chopsticks, two wooden skewers, or dedicated takoyaki picks (sold alongside the pans). The technique is the same regardless of tool - it is covered in detail in the method section.
No Takoyaki Pan? The Alternatives
Danish æbleskiver pan: Almost identical to a takoyaki pan - the hemispherical cavities are the same size and shape. If you make Danish apple pancakes, you already have the equipment.
Cake pop pan: Some silicone cake pop moulds work reasonably well, though the heat distribution is inferior to cast iron.
The improvised method: Fill a regular non-stick pan with enough batter to fill it 1cm deep. Cook until set on the underside, then cut into rough squares. The flavor is identical; the shape is entirely different. These are technically not takoyaki but they taste like it.
Ingredients
Makes approximately 24 takoyaki (serves 2-3)
The Dashi (Make First)
- 600ml cold water
- 10g dried kombu
- 10g katsuobushi (bonito flakes)
Quick version: 600ml water + 1 tsp dashi granules (dashi no moto). See Asian Street Food Pantry for sourcing.
The Batter
- 200g plain flour, sifted
- 2 large eggs
- 600ml dashi (from above) - the dashi-to-flour ratio is the critical variable; this ratio produces the correct consistency
- 2 tbsp soy sauce
- 1 tbsp mirin
- ½ tsp fine sea salt
The Filling
- 150g cooked octopus, cut into 1.5-2cm cubes - canned or vacuum-packed octopus is widely available and works very well; fresh octopus must be pre-cooked (simmered for 45-60 minutes until tender)
- 3 spring onions, finely sliced - 1 tsp per cavity
- 30g pickled ginger (beni shōga), very finely chopped - the pink, vinegared ginger (not the sushi ginger); adds sharpness and color
- 30g tenkasu (tempura scraps / crispy bits) - available at Japanese grocery stores; adds crunch inside the ball. Substitute: crushed plain crisps or panko, briefly toasted
The Toppings (Applied After Cooking)
- Okonomiyaki sauce - from The Street Food Sauce Bible or Otafuku brand shop-bought
- Japanese mayonnaise (Kewpie)
- Katsuobushi (bonito flakes) - the ones that dance in the heat from the balls
- Aonori (dried green seaweed flakes)
- Pickled ginger (optional, for serving alongside)
For Cooking
- Vegetable oil - for greasing the pan between batches
The Batter: Getting the Consistency Right
The batter ratio - specifically the ratio of dashi to flour - is the most important variable in the recipe. Too much flour produces dense, cakey balls that cook all the way through without the molten centre. Too much dashi produces balls that don't hold their shape when turned.
The correct consistency: The batter should be the consistency of single cream - thinner than pancake batter, thinner than a crêpe batter. It flows freely when poured, coats the back of a spoon in a thin, even film, and looks alarmingly liquid if you've made pancake batter before.
Method: Combine flour and salt in a large bowl. Whisk eggs together in a separate small bowl, then add to the flour. Gradually add the dashi, whisking continuously to prevent lumps. Add soy sauce and mirin. The batter should be completely smooth and free-flowing. Rest for 10 minutes before use.
The dashi matters here more than in other Japanese recipes. The batter is mostly dashi - the flavor of the dashi is the flavor of the takoyaki interior. Using water instead of dashi produces balls that taste of egg and flour. Using good dashi produces balls with an oceanic, umami depth that is irreplaceable.
Method: The Turn Technique
The turn is the defining skill of takoyaki making. It looks difficult until you understand the principle, after which it becomes straightforward and genuinely satisfying.
The Principle of the Turn
When the batter is first poured, the cavities are overfilled - the batter mounds above the rim. As the underside cooks and sets, there is still liquid batter above. The turn involves using two picks to rotate the partially-set ball 90 degrees, bringing raw batter down into the cavity while the cooked half forms the new top. This requires doing it at precisely the right moment - too early and the batter runs everywhere; too late and the shell has set and the ball splits.
The correct moment: 2-3 minutes after pouring, when the edges of each ball have turned visibly opaque and the batter at the top is still clearly liquid.
Step-by-Step Method
Step 1: Preheat the pan Place the takoyaki pan over medium-high heat. Brush or spray the cavities generously with vegetable oil. Heat for 3-4 minutes until the oil begins to shimmer.
Step 2: Add filling to the cavities Into each cavity, place: 1 piece of octopus (it should nearly fill the cavity), a pinch of chopped spring onion, a pinch of pickled ginger, and a few tenkasu.
Step 3: Pour the batter Pour batter into and over all the cavities simultaneously, deliberately overfilling each one - the batter should overflow between cavities, creating a connected web of batter across the top of the pan. This looks like a mistake; it is not. The excess batter will be folded in during the turn.
Step 4: Wait (2-3 minutes) Do not touch. The batter is setting from the bottom up. Watch the edges of each cavity - when the visible edge of batter has turned from shiny and liquid to matte and slightly opaque, you are approaching turn time. The top will still be wet and liquid.
Step 5: The first turn (90 degrees) Using one pick in each hand: insert the tip of one pick between two adjacent balls where the batter has set slightly. Use the other pick on the opposite side of the same ball for stability. Rotate the ball 90 degrees - bringing one side of the cooked shell up and over, folding the raw batter on top down into the cavity. The raw batter will pour down into the cavity as you rotate. Use the second pick to push any overflow batter into the cavity as needed.
Repeat for all balls. Work quickly - the pan temperature is high. After the first turn, the balls will look misshapen and partially raw on one side. This is correct.
Step 6: The second turn (another 90 degrees) After 60-90 seconds, repeat - rotate each ball another 90 degrees. By now, the shape should be clearly spherical, with the last raw patch being incorporated. Use the picks to push any trailing batter into the sphere.
Step 7: The final rotation and setting Continue turning every 60 seconds, rotating the balls freely on all axes, until they are golden brown all over and hold their spherical shape independently. Total cooking time from first pour to finished is approximately 8-10 minutes. The balls are ready when they roll freely in the cavity with minimal resistance, are uniformly golden, and feel slightly firm to the touch - but the interior will still be molten.
Step 8: Dress and serve Transfer the balls to a plate or traditional takoyaki boat (the little cardboard trays used at street stalls). Working quickly while hot, apply:
- Okonomiyaki sauce - squeezed from a bottle in a zigzag pattern, or brushed on with a pastry brush
- Japanese mayo - in a contrasting zigzag over the sauce
- A scatter of bonito flakes - watch them begin to move in the rising heat
- A scatter of aonori
Eat immediately. The molten interior stays liquid for only a few minutes as the balls cool.
The Vegan Version
Takoyaki adapts to a vegan version with substitutions that preserve the spirit of the dish completely.
Octopus substitute: King oyster mushrooms, cut into 2cm pieces, have a satisfying chew that approximates the texture of octopus inside a takoyaki better than anything else. Briefly marinate in soy sauce and sesame oil for 10 minutes before using.
Dashi substitute: Cold-brew kombu dashi (kombu steeped in cold water overnight) - the vegan dashi covered in the Asian Street Food Pantry guide. The flavor is slightly lighter than the full kombu-bonito dashi but genuinely good.
Bonito flakes substitute: Shredded nori sheets over the top - visually different but providing a similar oceanic, umami note.
Mayo: Vegan Japanese-style mayo (available at Asian grocery stores and online).
Okonomiyaki sauce: Replace the oyster sauce in the homemade recipe with mushroom-based oyster sauce (vegan version, widely available).
Filling Variations
The octopus is traditional and correct. These variations are widely made in Japan and are excellent:
Cheese and Corn
Replace the octopus with a piece of mozzarella and a few corn kernels. The mozzarella melts into a cheese pull when the ball is bitten - particularly popular with children and at home gatherings.
Prawn (Ebi) Takoyaki
Replace octopus with a single large raw prawn per cavity. The prawn cooks inside the ball as the batter sets - a faster, more readily available alternative to octopus.
Kimchi and Pork
Finely chopped kimchi (squeezed dry) and small pieces of cooked pork belly - a Korean-Japanese fusion filling that is spicy, rich, and extraordinary.
Mentaiko (Spicy Pollock Roe)
A small amount of mentaiko (spicy marinated pollock roe) in each cavity produces a deeply savory, slightly spicy interior that is a classic Osaka variation.
The Communal Experience
Part of the appeal of making takoyaki at home is the format: the pan sits in the centre of the table, everyone participates in the turning, and the balls are eaten immediately as they come ready - not all at once after a long cooking process.
This is the correct way to serve takoyaki at home. Set the pan on a portable gas burner or induction hob in the centre of the table. Provide everyone with picks. Let the less experienced cooks attempt the turning - they will make misshapen balls, which taste identical to perfect ones. The mistakes are part of the experience.
Drinks: Cold Japanese beer (Sapporo, Asahi), cold mugicha (barley tea), or - for the adventurous - cold sake. The contrast of cold drink and molten-centred, sauce-dressed takoyaki in a hot kitchen is the Dotonbori experience, reduced to its essential elements.
Pro Tips
- Overfill the cavities deliberately. The overflow batter between cavities is what you fold in during the first turn to complete the sphere. Filling the cavities to the rim only produces misshapen half-spheres.
- Oil the pan generously between batches. Takoyaki sticks without sufficient oil - re-oil after every batch, even on a non-stick pan.
- Don't rush the first 2 minutes. The most common mistake is turning too early, before the base has set enough to support the rotation. Wait until the edges are clearly opaque.
- The balls improve with practice. Your first batch will be misshapen. Your second batch will be better. By the fourth batch you will be turning with one fluid motion and feeling disproportionately skilled.
- Serve immediately. The molten interior sets as the balls cool. Takoyaki left for 10 minutes are still good but have lost the defining textural contrast between crispy exterior and liquid centre.
Common Mistake: Making the Batter Too Thick The most frequent cause of dense, fully-cooked takoyaki with no molten centre is a batter that is too thick - too much flour relative to dashi. The correct batter flows freely, looks alarmingly thin, and fills the cavities in a smooth pour. If your batter is the consistency of pancake batter, add more dashi - 50ml at a time - until it thins to single cream consistency. The correct thinness feels wrong until you taste the result.
FAQ
Q: Where can I find cooked octopus?
Most large supermarkets now carry vacuum-packed cooked octopus in the fish counter or refrigerated section. Spanish delis (octopus is a major ingredient in Galician cooking) carry it in various forms. Asian grocery stores carry it refrigerated or frozen. Canned octopus in olive oil (drain before using) is an excellent storecupboard option.
Q: Can I make takoyaki without an electric hob or gas burner at the table?
Yes - make them in the kitchen on the stove and bring to the table to dress and eat. The communal turning experience is lost but the result is identical. Have the toppings ready at the table and dress immediately as you bring the balls out - the heat from the balls activates the bonito flakes and keeps the sauce warm.
Q: My balls aren't forming a sphere - they're flat on one side. What went wrong?
Either the turn happened too late (the batter had fully set before rotating, so it couldn't be shaped), or too little batter was added to the overflow between cavities (not enough raw batter to fold in and complete the sphere). Next batch: more overflow batter and turn 30 seconds earlier.
Q: How long does the molten centre stay molten?
Approximately 5-8 minutes after leaving the pan, depending on the ambient temperature and how much batter was in the interior. Eat them as soon as they're dressed. Room-temperature takoyaki (set all the way through) are still enjoyable but the defining texture is gone.
Q: Is the pickled ginger in the filling the same as sushi ginger?
No - the beni shōga inside takoyaki is a different product from the sweet, pale pink gari (sushi ginger). Beni shōga is red, more sour and pungent, made with salt-pickled ginger steeped in umezu (plum vinegar). It is available at Japanese grocery stores. In the absence of beni shōga, a small amount of very finely minced fresh ginger is a reasonable substitute.
🔗 Continue Exploring
- The Essential Asian Street Food Pantry
- The Street Food Sauce Bible: 15 Sauces from 15 Countries - Okonomiyaki Sauce
- Korean Tteokbokki: The Spicy Rice Cake Dish Taking Over the World
- Vietnamese Bánh Mì: Building the Perfect Sandwich at Home
- Thai Pad Thai: The Street Stall Recipe, Made at Home
- How to Fry Like a Street Food Vendor: The Complete Home Guide
- 10 Street Food Dishes You Can Make in 30 Minutes or Less
- Global Street Food at Home: The Ultimate Guide
Latest